
December 8th, frost walls
After some tenuous moments during the process of digging our foundation, the footings were quickly formed and poured and made ready to start doing their job. The next step was stacking and pouring the frost walls.
(originally posted to LiveModern 2-9-2005)
Minnesota requires a frost wall depth of 48” which means that exterior walls must extend below grade at to at least this depth (or be buried in at least this much dirt). Our footing is stepped up at the northeast corner of the house because the upper grade level will cover the north and the northernmost part of the east wall to a depth in excess of 48”.
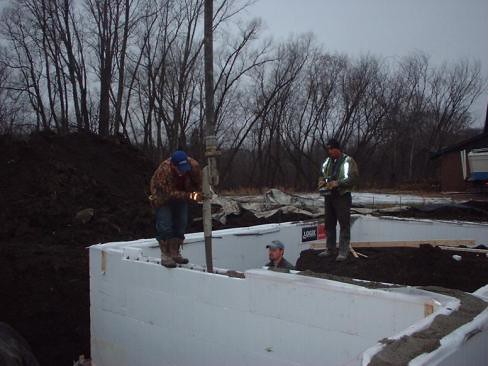
The location of the frostwalls, actually just a below-grade extension of the walls of the house, is laid out using string lines and a laser sight and snapped as chalk lines on the top of the footings. Next the frost wall formed, in our case using the same ICF blocks that will be used form all of the exterior walls. They're stacked like giant Legos, interlocking very tightly at the vertical and horizontal joints, and with ties inside that join the inner and outer faces of foam to provide a fastening point for finish materials and snap-in channels for the required horizontal rebar.
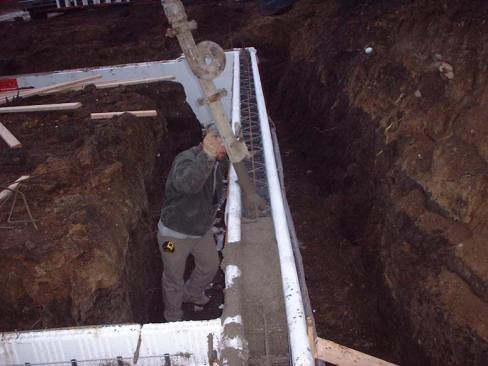
The first course of block is glued down to the footing using foam adhesive to ensure the walls are properly located and once the blocks are stacked to the appropriate height, the rebar verticals are inserted and the walls are straightened by shimming and bracing them against the sides of the trenches.
Since the lower level foundation slab will function as finish floor in our main living space, rebar was placed and embedded in concrete at the top of the frost wall and will later be bent out to extend into the slab and tie the floor to the walls.
We're waiting until near the end of construction to pour the foundation slab, primarily because the finish quality of any concrete flatwork is significantly affected by weather and temperature and we want ours as perfect as we can get it. Pouring during cold weather would have necessitated that, at a minimum, we heat the ground under the slab prior to pouring and that we cover and insulate the slab while it cured, both of which would have been costly and difficult and would not have guaranteed perfect results anyway. Additionally, there's a lot of plumbing and mechanical piping below the foundation slab that requires moderate temperatures to be installed and according to the plumber, the entire structure would have needed to be enclosed and heated. This would have been nearly impossible and again, costly. There was no structural need to pour the foundation slab before proceeding with the walls and upper level so we were able to delay it until spring without holding up construction.
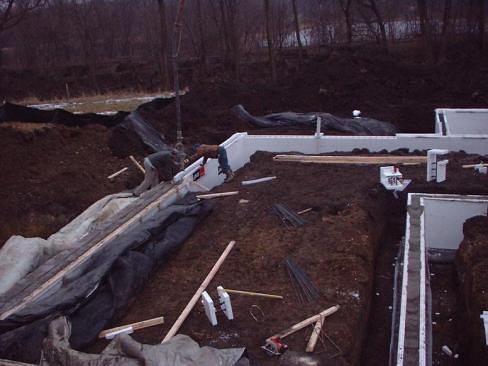
The actual pour of the frost walls was fast and uneventful and it was neat to have a sense of the footprint of the house for the first time. We let the walls cure for a few days and then had the excavator return to backfill the trenches and dump and spread the sand required beneath the foundation slab. While it felt like a big step to have a completed foundation, the bummer of it is that once everything is backfilled it looks like you've accomplished nothing and you're looking at a bunch of really expensive buried stuff.
(originally posted to LiveModern 2-9-2005)
Minnesota requires a frost wall depth of 48” which means that exterior walls must extend below grade at to at least this depth (or be buried in at least this much dirt). Our footing is stepped up at the northeast corner of the house because the upper grade level will cover the north and the northernmost part of the east wall to a depth in excess of 48”.
The location of the frostwalls, actually just a below-grade extension of the walls of the house, is laid out using string lines and a laser sight and snapped as chalk lines on the top of the footings. Next the frost wall formed, in our case using the same ICF blocks that will be used form all of the exterior walls. They're stacked like giant Legos, interlocking very tightly at the vertical and horizontal joints, and with ties inside that join the inner and outer faces of foam to provide a fastening point for finish materials and snap-in channels for the required horizontal rebar.
The first course of block is glued down to the footing using foam adhesive to ensure the walls are properly located and once the blocks are stacked to the appropriate height, the rebar verticals are inserted and the walls are straightened by shimming and bracing them against the sides of the trenches.
Since the lower level foundation slab will function as finish floor in our main living space, rebar was placed and embedded in concrete at the top of the frost wall and will later be bent out to extend into the slab and tie the floor to the walls.
We're waiting until near the end of construction to pour the foundation slab, primarily because the finish quality of any concrete flatwork is significantly affected by weather and temperature and we want ours as perfect as we can get it. Pouring during cold weather would have necessitated that, at a minimum, we heat the ground under the slab prior to pouring and that we cover and insulate the slab while it cured, both of which would have been costly and difficult and would not have guaranteed perfect results anyway. Additionally, there's a lot of plumbing and mechanical piping below the foundation slab that requires moderate temperatures to be installed and according to the plumber, the entire structure would have needed to be enclosed and heated. This would have been nearly impossible and again, costly. There was no structural need to pour the foundation slab before proceeding with the walls and upper level so we were able to delay it until spring without holding up construction.
The actual pour of the frost walls was fast and uneventful and it was neat to have a sense of the footprint of the house for the first time. We let the walls cure for a few days and then had the excavator return to backfill the trenches and dump and spread the sand required beneath the foundation slab. While it felt like a big step to have a completed foundation, the bummer of it is that once everything is backfilled it looks like you've accomplished nothing and you're looking at a bunch of really expensive buried stuff.
posted by splatgirl at 9:26 PM
![]()
![]()

1 Comments:
Did you finish your house?
My ICF house blog is www.blandingsdreamhouse.blogspot.com
Post a Comment
<< Home