Bathroom Vanity 101
A little DIY tutorial about how to make a bathroom vanity out of almost anything.
**********************As seen in the NEW YORK TIMES!!!!!!!************************
(See an updated post with the finished room here)
If you've been paying attention at all, you know that I really love IKEA. They've just got so much stuff that is great looking, practical and well priced, it's hard not to make the monolithic blue and yellow my first stop on any design mission.
In the case of our guest bathroom, I wanted something completely unique, which, when it comes to bathrooms can be really hard to do on a budget. There is just very little out there for fixtures and furniture that suits my style and doesn't cost thousands of dollars.
Enter IKEA's PS cabinet which suited the style of our house so perfectly and which I loved so much that I just couldn't resist buying. At $99 bucks, it's hard to go wrong.
As it turns out, it was a great size for our guest bath, so with a little tweaking, I turned it along with a piece of oak butcherblock countertop, IKEA's NUMERAR, into a spare yet interesting vanity.

This was really quite simple to execute, and the basic concept can be used to turn pretty much any cabinet shaped thing into a functional bathroom vanity. For those of you that subscribe to a more traditional style, this is how those cool antique dressers are turned into custom bathroom furniture and given outrageous price tags.
Anyway, here's the dirt:
The IKEA PS cabinet itself is freestanding, basically just assembled and plunked into place, but at ~25" high, it wasn't tall enough to serve as the vanity on it's own. So to raise things up a bit, provide some material contrast and a mounting surface for the vessel sink, I suspended the oak butcherblock countertop about 8" above the top of the cabinet, using heavy duty shelf brackets from the home center to hold it up:

Because the 1 1/2" thick butcherblock is rather heavy and it also needed to support the weight of the sink and faucet, I lag bolted the brackets into studs.
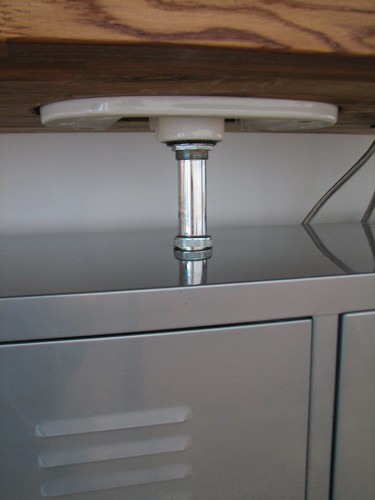
Then, on to the plumbing. Using a jigsaw, I cut a hole in the countertop to allow the sink to be slightly recessed, and then I dry fit the sink tailpiece (the straight piece that connects to the sink) and marked the location on the top of the cabinet. Then, using a 2" hole saw, I drilled a hole in the top of the cabinet for the tailpiece to stick through, down into the inside. In the picture, you can see the tailpiece extended down from the sink and into the hole in the cabinet:
Next you need to measure up from the floor to where the waste pipe for your sink comes out of the wall. Transfer this measurement to the back of the cabinet and, again with the 2" hole saw, drill a hole in the back panel of the cabinet that corresponds to the height of the PVC waste line coming out of the wall.
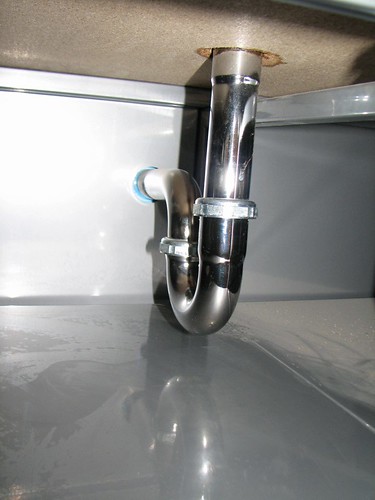
Once you test fit everything to be sure it's all going to line up, you can attach the P trap to the tailpiece and to the PVC waste line from the wall. Position the P trap so that the horizontal part that goes through the back of the cabinet and into the wall has a slight pitch toward the wall. It might require a little futzing to get everything positioned properly and snug, but when you're done it will look something like this:
Now, because the IKEA cabinet is rather shallow, I didn't want it set back flush with the wall. This meant I had room for the water shut offs and the waste outlet in behind the actual cabinet, between it and the wall. If you're using a dresser or something deeper that you want flush against the wall at the back, you can drill holes to allow the water lines and shut offs to be located inside the cabinet like you'd see in a typical undersink cabinet. This would make getting everthing hooked up quite a bit easier.
Here's what it looks like behind the cabinet:

Keep in mind that these directions would be applicable to a regular drop-in sink as well. You'd just need to cut a hole in the top of your cabinet to accomodate the sink and then follow the same procedure for placing the trap inside.
**********************As seen in the NEW YORK TIMES!!!!!!!************************
(See an updated post with the finished room here)
If you've been paying attention at all, you know that I really love IKEA. They've just got so much stuff that is great looking, practical and well priced, it's hard not to make the monolithic blue and yellow my first stop on any design mission.
In the case of our guest bathroom, I wanted something completely unique, which, when it comes to bathrooms can be really hard to do on a budget. There is just very little out there for fixtures and furniture that suits my style and doesn't cost thousands of dollars.
Enter IKEA's PS cabinet which suited the style of our house so perfectly and which I loved so much that I just couldn't resist buying. At $99 bucks, it's hard to go wrong.
As it turns out, it was a great size for our guest bath, so with a little tweaking, I turned it along with a piece of oak butcherblock countertop, IKEA's NUMERAR, into a spare yet interesting vanity.
This was really quite simple to execute, and the basic concept can be used to turn pretty much any cabinet shaped thing into a functional bathroom vanity. For those of you that subscribe to a more traditional style, this is how those cool antique dressers are turned into custom bathroom furniture and given outrageous price tags.
Anyway, here's the dirt:
The IKEA PS cabinet itself is freestanding, basically just assembled and plunked into place, but at ~25" high, it wasn't tall enough to serve as the vanity on it's own. So to raise things up a bit, provide some material contrast and a mounting surface for the vessel sink, I suspended the oak butcherblock countertop about 8" above the top of the cabinet, using heavy duty shelf brackets from the home center to hold it up:
Because the 1 1/2" thick butcherblock is rather heavy and it also needed to support the weight of the sink and faucet, I lag bolted the brackets into studs.
Then, on to the plumbing. Using a jigsaw, I cut a hole in the countertop to allow the sink to be slightly recessed, and then I dry fit the sink tailpiece (the straight piece that connects to the sink) and marked the location on the top of the cabinet. Then, using a 2" hole saw, I drilled a hole in the top of the cabinet for the tailpiece to stick through, down into the inside. In the picture, you can see the tailpiece extended down from the sink and into the hole in the cabinet:
Next you need to measure up from the floor to where the waste pipe for your sink comes out of the wall. Transfer this measurement to the back of the cabinet and, again with the 2" hole saw, drill a hole in the back panel of the cabinet that corresponds to the height of the PVC waste line coming out of the wall.
Once you test fit everything to be sure it's all going to line up, you can attach the P trap to the tailpiece and to the PVC waste line from the wall. Position the P trap so that the horizontal part that goes through the back of the cabinet and into the wall has a slight pitch toward the wall. It might require a little futzing to get everything positioned properly and snug, but when you're done it will look something like this:
Now, because the IKEA cabinet is rather shallow, I didn't want it set back flush with the wall. This meant I had room for the water shut offs and the waste outlet in behind the actual cabinet, between it and the wall. If you're using a dresser or something deeper that you want flush against the wall at the back, you can drill holes to allow the water lines and shut offs to be located inside the cabinet like you'd see in a typical undersink cabinet. This would make getting everthing hooked up quite a bit easier.
Here's what it looks like behind the cabinet:
Keep in mind that these directions would be applicable to a regular drop-in sink as well. You'd just need to cut a hole in the top of your cabinet to accomodate the sink and then follow the same procedure for placing the trap inside.
posted by splatgirl at 11:31 AM
16 comments
![]()
![]()