My Friend the Wire Rope
Behold the steel cable (aka wire rope), ferule, turnbuckle, and eyehook. Four of my favorite interior design secrets.
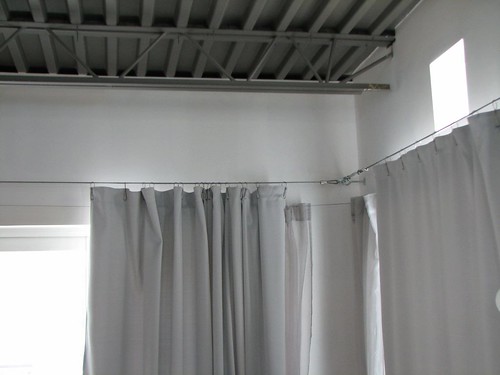
In this first application I've used these basic supplies, available at any hardware store, to construct a minimalist techie looking drapery hanging system that allows me to span a long distance, in this case both the length and width of my bedroom, with a few simple and inexpensive pieces of hardware and twenty minutes worth of effort.
Below you can see the whole set up: my DIY cable system with heavy outer drapes and under it the IKEA version of the tensioned cable, the DIGNITET, which works and looks great for lightweight fabrics or sheers but gets easily overwhelmed and saggy with a fabric that's even remotely heavy:
What's the big deal, you say?
The tensioned cable allows one to pull any number of drapery panels all to one side or another instead of having to split them to either side of larger openings because of those unfriendly center support brackets that most drapery hardware requires. And that, in my world, solves a huge and frequently encountered design dilemma that used to make me crazy.
Not your style, all those industrial looking metal bits? I've used this little trick in lots of regular houses too, except there I keep it a secret by covering it with a valance. I love love love doing this for sliding door treatments, because almost without fail, I find that sliders look much better when the panels go all to one side when open, (usually to the inoperable side so as not to interfere with traffic in and out the operable door), but that is nearly impossible with anything but a formal drapery traverse or a large diameter rod because of the dreaded center bracket. But I almost never like the look of those kinds of things or I'm doing a valance anyway and it seems stupid to go spending a bunch of money on something that's just going to be covered up.
So in situations where you have a longish distance to span and: A. you don't care for a big, decorative rod, B. you want to spend like $4 instead of $400, C. the rod would be covered by a valance anyway, or D. you like the minimalist-industrial thing, the tensioned cable is your best friend.
But it doesn't stop there.
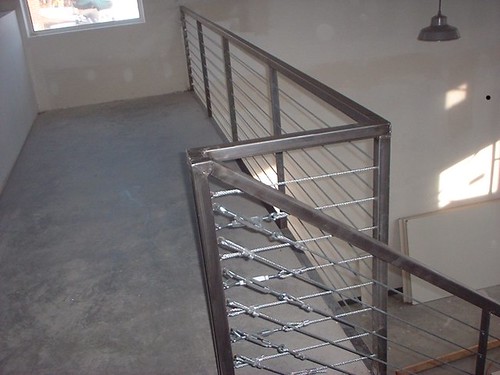
This friend also served me well in the stair and balcony railings in our house. I knew I wanted a horizontal cable rail (fortunately it complied with code here but that is not the case in a lot of areas so check first) but I didn't like the look, materials or cost of any of the commercially available cable railing systems. When I was looking, these ran on the order of $110 a linear foot and up, which at my house would have meant $10,000 minimum in railing alone. Do I need to tell you that wasn't a Modern in MN budget figure?
Instead, I had a basic steel framework welded up and installed and then spent a couple of very sweaty days wrestling 1/4" cable to do the infill myself. One thousand feet of cable, turnbuckles, ferules and the ~$300 swageing tool to put it all together cost me less than $1K, or one tenth the price of the commercially produced kits that are made from lesser materials and that I would still have had to install myself. Now THAT was definitely within my budget and I think it looks a hundred times cooler.
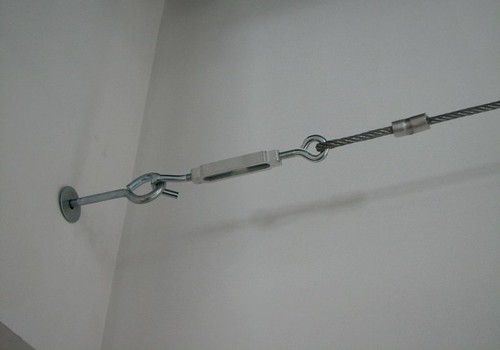
The basic components of a wire rope rig-up I've already mentioned: wire rope, ferules, turnbuckles and eyehooks. Four simple and cheap little piecesparts that do so much.
Wire rope comes in a whole range of gauges and construction, but unless you're hanging humans or several tons worth of stuff, don't worry about the construction or strand count of the cable. Just get some that's the size you like, keeping in mind that the skinnier stuff is easier to work with.
Most decent hardware stores will carry a range of gauges of rope that will be fine for household use. They'll also have the ferules or the little metal sleeves that are smushed in place to make a loop in the cable. It's important to get the ferules that correspond to the size cable you choose, because the ferule is all about using friction to hold things in place. Likewise, you'll also find eyehooks and turnbuckles at the hardware store, and you can choose these based on looks alone or, if you're suspending something heavy, based on duty rating which I'll discuss below.
If you want either the cable or hardware in a specialized metal, like stainless steel, check out marine supply stores or look online for "rigging" or "swaging" equipment. Stainless costs a bit more, but this is the way you'd want to go if you're doing anything outdoors or in a wet area like a bathroom.
A few words about "swageing", which is the term used to describe applying the ferule to the wire rope. Like ferules, the tool used to swage, ie the hand swager, is sold in sizes that correspond to the ferule size. From what I can tell, one swaging tool is typically suitable for two or three consecutive sizes of rope and ferules, and they also have a nice bypass cutter on one side for cutting the cable. But unless you're doing something really heavy duty with thick cable, forget the specialized tool because they're expensive. All you need to smush those ferules on and make a nice sturdy loop is a good pair of pliers and a strong grip or a bench vice that you can whack shut a few times. A heavy duty wire cutter will cut smaller diameter cables with a bit of effort. If you're using thicker gauge cable, you can ask them to cut it to length for you wherever you buy or use a hacksaw with a metal cutting blade. For the latter, wrap a piece of masking tape around the rope before you cut. This method has served me well for many wire rope projects, and again, unless you're making something that your life depends on, don't worry too much about the how and the what of the specialized tools. But for the sake of knowing our stuff, here's what a swager looks like:
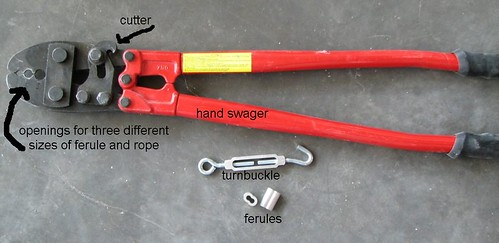
This one works on 5/16, 1/4, and 5/32 diameter cable and ferules, otherwise known as pretty heavy duty stuff. It's roughly the size of a large bolt cutter.
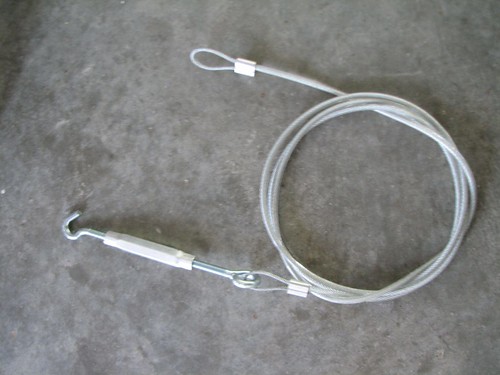
In the picture above, you can see an alternative style of turnbuckle. It works exactly the same as the open ones shown in the previous picture in that the body turns on the screw eye and hook to either shorten or lengthen itself. Turnbuckles have load ratings just like wire rope, so be sure the turnbuckle you choose has a load rating that meets or exceeds the weight of what you want to support. I tend to buy bigger turnbuckles than are necessary just because I like the way they look, but having a nice strong turnbuckle can never hurt when you're doing something that will require a lot of tension on the cables.
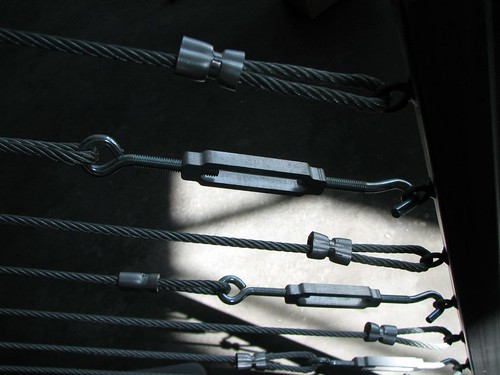
The picture below is of the cable railing I installed here at Modern in MN, and you can see the individual components I've mentioned. The ferules I swaged using that big fancy tool (that crimp mark on the ferule is from the swager) because these cables have a fair amount of tension on them. In a critical application, each ferule would be crimped three times, and then this gauge cable and loop could support something like 6000 pounds. Considering it took all my strength to operate the swager and that my cables have something like 1/10th that amount of tension on them at best, I opted to crimp each ferule only once:
Below is another of my favorite ways to use wire rope. In this application, I used very thin gauge rope and a couple of eyehooks to suspend an old window from two hooks in the ceiling:
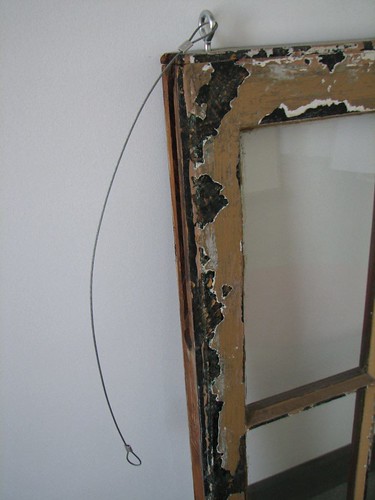
Wire rope works great for things like this because it's visually unobtrusive and it hangs nice and straight and neat looking.
Anyway, there you have it, and introduction to my friend the wire rope and a couple of ideas. Now run free and swage :)
posted by splatgirl at 12:01 PM
41 comments
![]()
![]()