This is so ridiculously overdue that it's already collected dust. More on that later. Meanwhile...
At long last, I bring you the great closet-doors-into-room divider project, something that had been on the agenda here at Modern in MN since the early, early, pen and paper planning stages.
This is an idea that has come up pretty regularly in hack-dom, and I'm certainly not the first person to execute it. I guess that's one of the extraneous benefits of being on the ten year building time line, that sometimes other people get down to the figuring out before me!
Certainly there are many different ways of getting to this same end product and the specifics depend largely on the circumstances of each application. I owe a big thanks to someone in an old Apartment Therapy post for the genius use of the STOLMEN post in this deal, and to huku at IKEAFANS for further comment.
So if only for inspiration, here's how Boy and I turned a set of IKEA's frosted glass and aluminium STORDAL closet doors (for the PAX system) into a room divider. Because they're just too cool not to repurpose!
Now, as I said, this project had been on my agenda since very early on. Because of that and because I was the head carpenter for all our interior wall framing, I was able to size the opening to perfectly accommodate the planned STORDAL door hack. Here's a shot of the opening. It's the pass through between our guest room and gym:
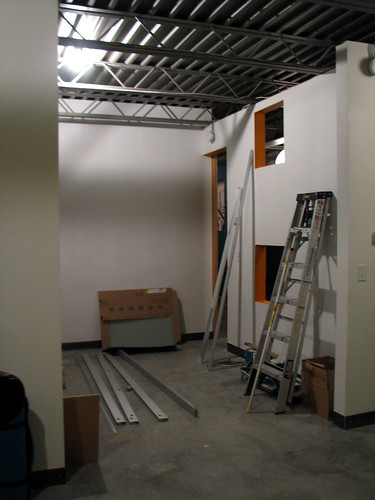
If you're working with an opening that is narrower than the width of the doors, never fear, you'll just need to mount a cleat to the wall to allow you to attach the stock top rail to the wall surface and you'll end up with something like my recycled sliding bath and guest room doors.
So, aside from the STORDAL doors in the size of your choice (they come in two heights and three widths), this little hack also required a couple of the sturdiest looking 4" L brackets I could find, one STOLMEN post and two of the metal clamp "end fixture" thingies that go with the STOLMEN system.
The general gist of this set up is that it uses L brackets to support the stock IKEA sliding door top rail on either end and an additional center support point for the rail via the use of a STOLMEN post and bracket.
Start by assembling the doors. I dunno why, but it came as a bit of a shock to me that they come unassembled. But they do, and they take a few minutes and a spot of clean floor space to get together.
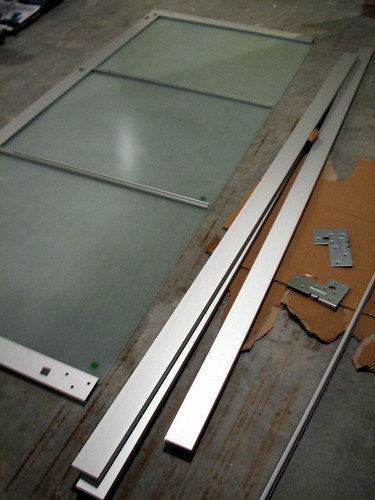
The first door assembled:
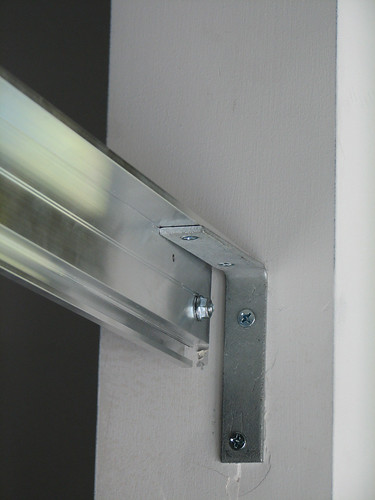
If you want to install the doors in a framed-to-fit opening like mine, figure out where in that opening, front to back, you want the doors to sit, and install an L brackets on either end. I placed my brackets so that once hung, the face of the doors would be flush with the face of the wall. Make sure both screws go into studs:

To determine the correct height for the brackets, I added 1 /2" to the height of the doors. If your floor is perfectly flat or very uneven, you can fine tune this amount of clearance accordingly.
Once the end brackets are up, install the STOLMEN post. They're height adjustable to fit virtually any ceiling height and work sort of like a shower curtain rod in that they're held in place mostly by tension/friction. Basically all you've got to do is plunk it into place and twist to lock.
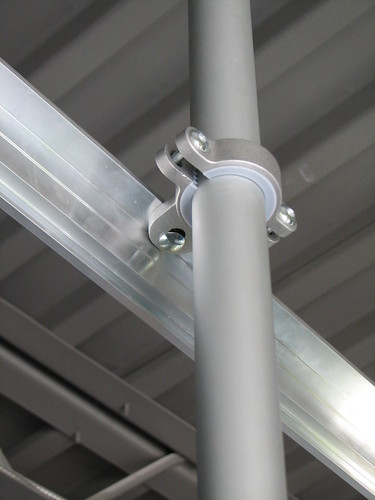
And remember that little clamp for your STOLMEN post? That's going to support the top rail in the center, so you're aim here is to set the post so that once the clamp is installed, the tab ends up in the same plane as the L brackets you've already got up.
Here is our post installed and waiting. Keep in mind that the post will be BEHIND the doors.


(the picture below shows the rail already bolted to the clamp, but you get the idea...)
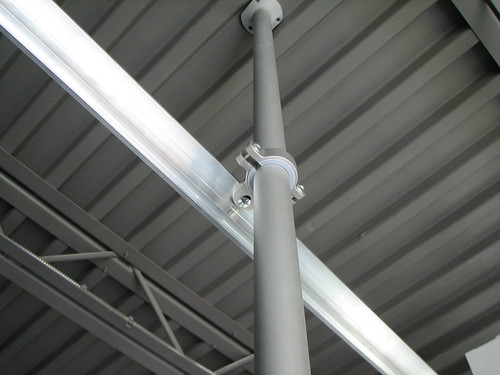
Set the post, lock it into place and put the clamp on, but don't screw anything down too tight yet because you want to test fit the top rail across your opening first.
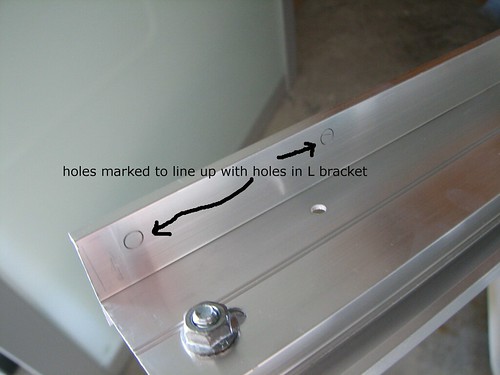
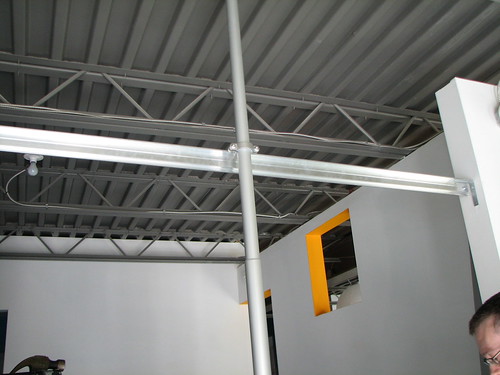
As I said, you want to test fit the top rail next. Set the rail across the opening, resting either end on the L brackets you already installed and sliding the STOLMEN clamp up on the pole so that the tab is just touching underneath the lip of the rail as shown above. Once you're sure it's level and straight, use a pencil to mark the rail for drilling at the clamp and both L brackets. If you're using 4" L brackets, you should have two holes per side plus one in the center for the clamp. These marks indicate where you'll drill the top rail so you can bolt through it to attach it to the L brackets and the center post.
And while you've got that rail up there, fine tune the position of the STOLMEN post, double checking that it's plumb and centered in the opening. Once you've got it perfect, it may be helpful to mark the location of the ends of the post on the floor and ceiling, just in case.
Take down the rail and drill out all the holes you've marked. Reinstall the top rail using a short nut and bolt through the brackets and into the rail. On the STOLMEN bracket, you can use the nut and bolt that comes with it. At this point you can also secure the round ceiling and floor brackets for the STOLMEN post in place using the appropriate fastener, i.e. screws if you live in a normal house.
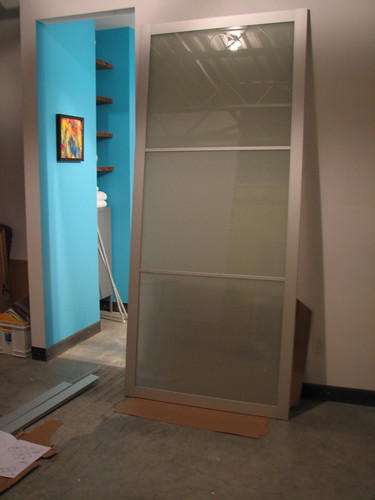
Once it's up, tighten everything so it's nice and snug. All that's left to do now is hang the doors:

Now, if you look closely, you can see that the doors are not hanging perfectly plumb. As it's produced, the IKEA mounting system for these sliding doors uses a bottom rail which I chose not to incorporate. But remember that I told you to buy two of the end fixture brackets for that pole? Mount the second one at the very bottom of the pole and make yourself a standoff/bumper for those doors to get them to hang straight by sticking felt furniture glides to a smaller angle bracket and bolting it to the clamp. Alternatively, make a U shaped guide lined with felt and attach it to the floor at the center of the doors.
Unfortunately I still can't show you the finished room in living color but it's coming soon. Or just as soon as I work out an issue with that head carpenter I mentioned earlier...
Impresionante chaval,
ReplyDeleteSencillamente magnifico, ni se me hubiera pasado por la cabeza. Soy chica y la verdad es que lo veo un poco complicado para mi, pero pediré ayuda y seguro que me ahorro unos eurillos.
saludos desde España
Alexandra
Hi Splatgirl,
ReplyDeleteI discovered your BLOG in a round about way and am delighted to have found it! I am always visualizing projects around my house, some I have tackled and others stay noted until I can figure out how to actually create it...which is why I am so happy to find this particular project of yours.
I am in the process of replacing two separate entry doors to my small master bath room...they take entirely too much space opening and closing doors for such a small room. So, I had an idea to mount some modern glass doors on the wall with a sliding track...similar to your other project of a wall mounted glass door to your bathroom.
I have already placed my order for the wall track from Johnsons and am wondering if you could share some input about the proper size of door to use with regard to height. It seems like the standard size door is 80" high my
door opening is 80 3/4"...I'm not sure if I need to order a custom sized door for added inches to use with the wall track (which will be much more costly) or if I can get away with using the standard sized door?
Any advice and anything that I should consider would be most appreciated, as I admire your talents!
Thanks!
Hi zen
ReplyDeleteIdeally, the door would be at least a few inches taller than the opening so that it completely covers it. I think a standard 6'8" door would work, but you might end up with a bit of a gap at the top depending on how high you hang the track. Since you're not really going to shut out noise with a surface mount door anyway, it's just an aesthetic preference and, IMO not one worth paying the extra $$ for a custom door.
I assume you are going to have to remove trim and the door jamb anyway, so it wouldn't be much more work to drop the height of the opening down a couple of inches at that point. Option B if you don't want to mess around with lumber or patching drywall would be to figure out a way to add a couple of inches onto a standard sized door that looks intentional and/or cool...maybe build it up with a couple of plywood strips and cover with a metal kick plate on either side?
OR...how high are your ceilings? You could hang the track at the ceiling and use a standard 8' door (you might need to trim it down a bit). A plain birch/poplar solid core can be had for around $100 from the big store, special order.
Yay! I love your ideas, especially the metal kick plate...I have a good friend that works with stainless steel and has lots of excess...I can really visualize this...now I can't wait to tackle this project! Many Thanks!
ReplyDeleteawesome post. ikea doesn't appear to carry the stordal doors anymore. do you the the PAX LYNGDAL doors will work? i'm sure i'm expecting to much but if you do know then that'd be great, thanks.
ReplyDeleteI think they're basically the same thing with a diffrent name. Any of the sliding doors for PAX will work with the same set up.
ReplyDeleteHi,
ReplyDeleteTHANK YOU so much for your blog post on the IKEA wardrobe doors turned room divider. I just finished the door installation yesterday. It looks amazing! Now, I'd like to attach a handle to the door (on both sides) but do NOT want to drill and risk ruining the glass, etc. Any way that I can attach a handle somehow?
PLEASE HELP!
Thanks,
Heather
I think you'll have to drill. I assume you had to assemble the doors which should give you a pretty good idea of how far the glass extends into the frames, i.e. not very much, so IMO drilling holes isn't much of an issue. Finding a two sided handle probably is, however. Good luck. I'm still looking for the perfect solution for all four of my sliding doors. The best I've come up with is IKEA's GRUNDTAL hooks: http://www.ikea.com/us/en/catalog/products/30061247 which work because they mount from one side vs. having screws that go all the way through.
ReplyDeleteHey,
ReplyDeleteThanks so much for this awesome post! I'm extremely interested in installing this in my apartment and had a couple questions:
1. I live in an alcove studio and want to separate the bedroom from the living room. The opening is pretty large - about 11 feet - so I'm considering doing one of two things...Either install two of these doors at either end of the walls and have the doors slide open in the center. OR Extend the wall with some other panels and have the door open at the far end of the room. Does that make sense? If so, which one would you recommend? I'd prefer to have the opening in the center of the room, but I'm not sure how to avoid having a pole running down the middle of the entrance? Do you think I can cut the pole and mount it to the ceiling to support the rail?
2. How exactly did you secure the doors to the bottom of the track? You mentioned you made a standoff/bumper by using furniture glides, but I'm not sure what those are. Could you possible send me a picture or a link the where I can buy the material?
I really appreciate the help!
-Ronnie
Hi Ronnie
ReplyDeleteI think it sounds like some carpentry would be necessary. First consider how one or two sets of doors relate, size-wise, to the width of your opening.
Either option you mention is doable, both will require some thought and engineering.
Look at the ikeahacker website if you haven't already--there is a much more elegant and purpose built version of this hack there that might give you some more ideas.
If you dislike the idea of a center support pole, then you'll need some method of mounting/supporting the top track across the entire span--assuming your ceilings are taller then the doors, of course. In this case, you're basically installing them exactly as if they were on a PAX carcass, only there's a header in place of the top edge of the PAX. Cutting a bit of pole (or whatever) and mounting it to the ceiling (good idea!) to support the track might work instead of a full header, yes. Even something as simple as a hunk of threaded rod may be enough...it just has to support the track enough that it doesn't sag or twist when the doors are in place. You'd just have to try it.
As I think I said in the post, initially I was hoping I could get the whole thing to work without the bottom rail, but alas, this was an absolute no-go. So ideally, you'd recess the bottom rail into the floor across the entire width of the doors (like bi-fold closet doors), and both would be operable. With concrete floors, I couldn't do that, so I have half a track and one fixed door plus the pole that holds everything up.
The standoff I just made using sticky back felt cut to size and attached to a bracket. There's no reason you'd need to use this material. The point was just to make a spacer and to avoid having metal rub on metal. Many versions of this kind of thing can be found where you'd get the fuzzy button thingies you stick on the ends of chair legs to make them no scratch, aka furniture glides.
good luck!
First off great instructions Splatgirl!
ReplyDeleteSimilar to Ronnie I might be trying a version of this room divider "hack" in a new studio apartment I'm moving into. The span I'm going across will be about 11' wide but I was thinking about possibly using a tall Expedit Bookshelf on one side and the PAX sliding door system on the other. Do you think this could work well as a room divider ?
If so I had a couple Q's for 2 options
1.Do you think mounting one of the L-brackets to the top of the expedit would be able to secure smaller width doors enough with a post in the middle
2. Would there be any way to run a door frame across the top of the expedit and across the span so I could move a wider door over the full length. This would avoid having half a door always occupying the door span
Thanks!
Hi Dan
ReplyDeleteAttaching a support bracket to the expedit sounds like a bad idea. There's not much solid to those at all and they're not really designed or intended to support weight other than on the shelves. I would build or fix something in the opening (a 2x4 or a two come to mind) to give you something sturdy enough to support the L bracket and top rail.
You might be able to adapt the center pole and bracket thingie I did to work as a way to support the end of the top rail, too.