
STORDAL Hack Revisited
A while back, I posted a little DIY write-up on turning IKEA's STORDAL closet doors into a nifty room divider. But it ended a little abruptly and I was not as thorough as I would have liked with that post because once we got the hanging stuff in place and the doors installed, a little framing error I made way back when and then promptly forgot about came back to haunt me.
We got the doors up and it was a satisfying to see another long-imagined project so close to completion, but as we were standing back admiring our work, things started to seem just a little wonky. As it turns out, the walls on either side of the opening were not in the same plane.
Oh yea.
I remember making that screw-up. And I also remember deciding to ignore it.
Oops.
So, just as we were reaching the point where I was starting to feel like we had banished new construction drywall dust forever, we had to go and do some demo and some rebuilding and make a whole bunch more.
Sigh.
But after much procrastination and foot dragging and misery, the offending wall was torn down and rebuilt and re-drywalled and taped and mudded.
And then a whole bunch more dust was created and vacuumed up from every possible surface.
Again.
And then, finally, we re-hung the doors and I was forced, once and for all, to pay some attention to getting them to hang and operate as if they were made for the space, and that information is what follows. I know the original has been a very popular post, so hopefully I've made things clear and do-able in this addition, but if not, please feel free to leave me comments or questions and I'll address those as best I can. And also keep in mind that there's no reason you'd have to use this particular style of door. IKEA offers several varieties of sliding doors for PAX and this hack would work exactly the same with all of them.
In the original incarnation, I rejected using the bottom rail for this hack, but after some looking and seeing, I decided that the only way to achieve a satisfactory install and get the doors to operate and hang perfectly was to figure out how to incorporate the bottom rail...which I did, but I also had to concede the fact that to achieve the above AND leave the threshold clear, I was going to have to live with only one door being operable.
But trust me, it doesn't matter, and the hack is 100 times better for it.
So, how to address the bottom?
First, here's what the whole deal looks like from the back. It's hard to tell, but I ended up moving the STOLMEN post so that instead of being centered in the opening, it's about 4" to the right of center, the reason for which will be revealed shortly. Other than that alteration, the top rail set-up remains unchanged from my previous post. Keep in mind that in the photos that follow, the operable door is on the right, and the left door is fixed. (From the front, the operable door slides in front of the fixed door.)

Notice the rail across the bottom of the inoperable (left) door? Normally this would run the full length of and be attached to the lower edge of the PAX carcass for which it's intended. For my purposes, it's cut down from it's full length to be the same 4" longer than half the opening width and since we are carcass-less, it's attached to the STOLMEN pole and the side wall of the opening:
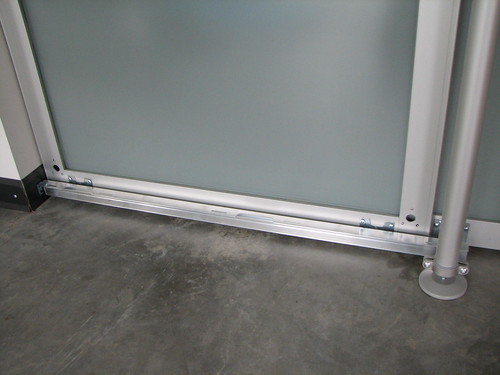
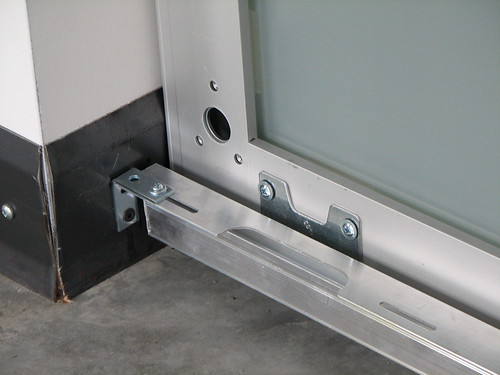
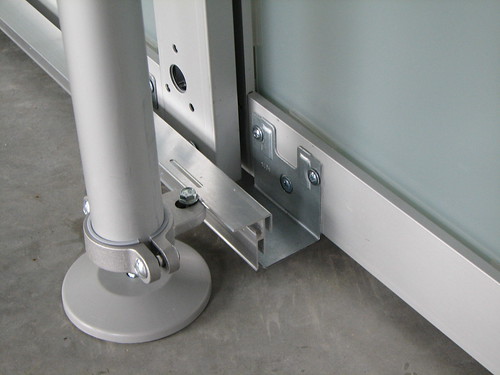
I used the clamp thingie on the STOLMEN post as a standoff, and a small L bracket screwed into the wall to hold the rail up at the same height as it would be were it on a PAX carcass.
A close up of the wall attachement with L bracket:
And a close up of the STOLMEN pole and clamp that holds the other end of the rail in place:
Putting that rail to use and getting the doors to hang and slide perfectly means the fixed door has both of it's lower brackets attached and in use, slotted into the the lower track just as they would in a normal install. The operable door uses only a single lower bracket at the corner where the two doors would overlap. The bracket that would normally attach to the front edge of the operable door (the edge where you would grab the door (or place a handle) to open is not used. The length of the bottom rail and the position of the STOLMEN pole described above are very much on purpose, so that when the doors are in place and the operable door is fully closed, the lower bracket is still slotted into the bottom rail. And because you wouldn't want that rail sticking out all by itself into nowhere, the STOLMEN pole is positioned behind the end few inches. This arrangement is shown in the last photo, above. Note that the operable door is closed and its lower bracket is retained in the track.
It's a little trick to get the door brackets slotted into the rail and get the rail fixed to the wall and post and at just the right height, but a little patience goes a long way, and once everything is in place and adjusted, the doors hang perfectly and the operable door works exactly as it should. And since both doors are supported entirely by the top rail, nothing catastrophic would occur if the "fixed" door is moved but it would be a bit of a pain to thread it back into the lower track so for a little insurance, truly fix the fixed door in place with a stop screw through the upper or lower bracket.
And then celebrate your super cool, clever and perfectly useful new room divider...on a budget! Hurray!
We got the doors up and it was a satisfying to see another long-imagined project so close to completion, but as we were standing back admiring our work, things started to seem just a little wonky. As it turns out, the walls on either side of the opening were not in the same plane.
Oh yea.
I remember making that screw-up. And I also remember deciding to ignore it.
Oops.
So, just as we were reaching the point where I was starting to feel like we had banished new construction drywall dust forever, we had to go and do some demo and some rebuilding and make a whole bunch more.
Sigh.
But after much procrastination and foot dragging and misery, the offending wall was torn down and rebuilt and re-drywalled and taped and mudded.
And then a whole bunch more dust was created and vacuumed up from every possible surface.
Again.
And then, finally, we re-hung the doors and I was forced, once and for all, to pay some attention to getting them to hang and operate as if they were made for the space, and that information is what follows. I know the original has been a very popular post, so hopefully I've made things clear and do-able in this addition, but if not, please feel free to leave me comments or questions and I'll address those as best I can. And also keep in mind that there's no reason you'd have to use this particular style of door. IKEA offers several varieties of sliding doors for PAX and this hack would work exactly the same with all of them.
In the original incarnation, I rejected using the bottom rail for this hack, but after some looking and seeing, I decided that the only way to achieve a satisfactory install and get the doors to operate and hang perfectly was to figure out how to incorporate the bottom rail...which I did, but I also had to concede the fact that to achieve the above AND leave the threshold clear, I was going to have to live with only one door being operable.
But trust me, it doesn't matter, and the hack is 100 times better for it.
So, how to address the bottom?
First, here's what the whole deal looks like from the back. It's hard to tell, but I ended up moving the STOLMEN post so that instead of being centered in the opening, it's about 4" to the right of center, the reason for which will be revealed shortly. Other than that alteration, the top rail set-up remains unchanged from my previous post. Keep in mind that in the photos that follow, the operable door is on the right, and the left door is fixed. (From the front, the operable door slides in front of the fixed door.)
Notice the rail across the bottom of the inoperable (left) door? Normally this would run the full length of and be attached to the lower edge of the PAX carcass for which it's intended. For my purposes, it's cut down from it's full length to be the same 4" longer than half the opening width and since we are carcass-less, it's attached to the STOLMEN pole and the side wall of the opening:
I used the clamp thingie on the STOLMEN post as a standoff, and a small L bracket screwed into the wall to hold the rail up at the same height as it would be were it on a PAX carcass.
A close up of the wall attachement with L bracket:
And a close up of the STOLMEN pole and clamp that holds the other end of the rail in place:
Putting that rail to use and getting the doors to hang and slide perfectly means the fixed door has both of it's lower brackets attached and in use, slotted into the the lower track just as they would in a normal install. The operable door uses only a single lower bracket at the corner where the two doors would overlap. The bracket that would normally attach to the front edge of the operable door (the edge where you would grab the door (or place a handle) to open is not used. The length of the bottom rail and the position of the STOLMEN pole described above are very much on purpose, so that when the doors are in place and the operable door is fully closed, the lower bracket is still slotted into the bottom rail. And because you wouldn't want that rail sticking out all by itself into nowhere, the STOLMEN pole is positioned behind the end few inches. This arrangement is shown in the last photo, above. Note that the operable door is closed and its lower bracket is retained in the track.
It's a little trick to get the door brackets slotted into the rail and get the rail fixed to the wall and post and at just the right height, but a little patience goes a long way, and once everything is in place and adjusted, the doors hang perfectly and the operable door works exactly as it should. And since both doors are supported entirely by the top rail, nothing catastrophic would occur if the "fixed" door is moved but it would be a bit of a pain to thread it back into the lower track so for a little insurance, truly fix the fixed door in place with a stop screw through the upper or lower bracket.
And then celebrate your super cool, clever and perfectly useful new room divider...on a budget! Hurray!
Labels: ikea hacking house building interior design stordal doors room divider
posted by splatgirl at 11:15 AM
![]()
![]()

18 Comments:
my husband and i just bought an amazing 1949 california rambler in south minneapolis this fall and are about to do a bunch of work on it - new floors, new fence, new lots of things. one of our upgrades is going to be installing sliding doors in the hallway, and we're thinking of getting our hardware from johnson hardware. would you be willing to give me more detailed info on your experience with that project? thanks!
Hello,
I've been looking through your blog and I really love your house! I'm curious about what you used for your baseboards. I like the aesthetic with the concrete floor, but I can't tell what material you used. If you could email me (r e d f e m m e 1 @ e a r t h l i n k . n e t) I'd really appreciate it. Thanks!
hello, thanks for your detail post and I'm planning to use your details to do a room divider for my mom. We bought the 118 x 92 inch doors at the as is dept in Ikea. Since the door doesn't reach the other side of the wall, we were planning to use 2 tension poles. Being that the only option in the as is department is the biggest door they offer, do you know if the track is strong enough to hold the weight of the door since it was meant to be install on the wardrobe? Do I need to get something to re-enforce the track?
This comment has been removed by a blog administrator.
Hi Annie. sorry I'm just seeing this now for some reason.
I have no idea how the rail on it's own would bear up under the weight of the larger doors. I guess I would try it and see, and then if it doesn't seem like it's going to work out attach it to some sort of a rigid header.
great house. we are building in MO and having trouble finding galvalume corrugated siding. know any current sources?
hi Aimee
look on their website for a distributor near you.
Hi there -- love your blog, as I'm a great fan of DIY, modern design, etc...
I can't find the post now, but wasn't there a pic on your site a while back that had a kind of hanging garden in one of the bigger rooms? If that's correct, would you mind sharing what plants those are? I'd love to have something like that as well, but I'm worried about the lack of light indoors.
Thanks,
Pete
Hi pete
Wasn't me, but I do have an idea like that stuck in my head, coincidentally.
Philodendron and pothos are two plants that usually do OK in low light and are vining/trailing,
This project is exactly what I am trying to do in my new (small!) apartment. Has anyone done this install in New York? I'm looking for advice and/or help! I'm a newbie at DIY construction projects but just bought the Pax doors for this and am trying it out...
If you can get over your fear, have a basic grasp of geometry plus a tape measure and a drill, these two posts are about all you need to know. Really.
Hey I'm wondering how to do this in an L shape, thinking about buying 2 sets of Pax doors. The issue is where the doors meet, what do you think I should do?
Hi. I love the house and this post specifically. I also plan to do this with the larger doors, between 2 walls. It's an L shaped studio in NYC. I'm confused with the whole left door/right door (not sure if it's my left or yours). Is the rail at the bottom on the fixed door or on the operable door? Thanks in advance.
It's left and right in the photo. The rail and fixed door are the left one.
Poke around a bit elsewhere as there are others who have done this since me and come up with better set ups.
It would be much simpler if the opening were framed to the size of the doors, height-wise, and if one can recess a track into the floor...neither of which I wanted or could do.
Hi. It's been a while since you did this, you still loving it? Thanks (I'm considering it to divide a room that I have for my dogs, 2 of which don't get along).
k
Hi K
Yep, still fabulous. Look around on the internet for some alternative install options. There are a few that I've seen that seem better than the way that I did it...
I would like to do this for a client but both of the doors would need to slide. And it would need to be stable. In your last comment on this thread you said "There are a few that I've seen that seem better than the way that I did it..." Could you share? Your instructions and photos are fabulous, I couldn't find anything better. But if you did, please share!
Hi Liz
I think your requirements would be easily met if the install were in a framed, finished opening vs. what I was working with. Check out the ikeafans.com website if you haven't already. At least a few other incarnations of this project are there.
Also note that these doors have changed names since my install which may affect what you get via web searches.
Post a Comment
<< Home