Kee Klamp Trellis
Have you heard of Kee Klamp? They're a whole line of plug-and-play fittings that can be used for building just about anything out of fence post or iron pipe, and they're pretty neato. With iron pipe, they accomplish the same thing as standard threaded pipe fittings, only with way, way more flexibility and minus the whole threaded thing. But as I said they also work with lighter weight galvanized fence posts. Perfect for adding a quick and easy something to our once barren back door area.
There's a tough, tough life outside our back door. It's a spot where just about a perfect storm of hostile-to-plant factors come together to make for a pretty unfriendly environment for things that grow. Unfortunately, things that grow are exactly what is needed there.
For a couple of years we had a really cool twisted baby locust tree. It did great and grew like mad and got huge and perfect, right up until it died one winter. So sad. It took me a whole year to accept it was dead, not a little bit because having to cut it down meant having to figure something else out...
Thus began the hunt for solutions to adding some green and vertical to this spot. Something super cold hardy and moisture issue-tolerant and perennial and of a not-too-big scale...which excludes most trees. Kind of a tall order once I got right down to it.
Eventually I decided I liked the lower risk, easier to plant (and remove should this plan B fail) idea of a vine of some sort and that a trellis for said vine would be an interesting way to add some dimension to the otherwise completely flat side of the house. Plus I figured if worse comes to worse and I fail again, I can always resort to a fast-growing annual vine instead.
So anyway, out came the Kee Klamp card. Because it's just too handy and cool of a product not to find a way to use.
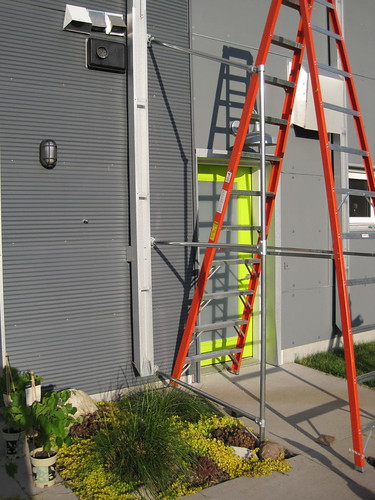
Following one of those very non-specific kinds of plans that I seem to excel at, first I figured out what size and shape I wanted for the finished trellis. After acquiring the necessary supplies and fittings, we cut the fence post sections to the appropriate length, hooked the whole thing together and plunked it into place. As I said we went with galvanized steel fence posts which are available at the home center in 10 foot lengths and various diameters, just be sure you choose a size that corresponds to a Kee Klamp size. The actual Kee Klamp joinery is easy as can be--slip the fittings onto the pipe ends and tighten the allen screws to hold them in place. What's not shown here is that the lower section of vertical post is pounded down into the ground a few feet to help hold the whole thing in place:
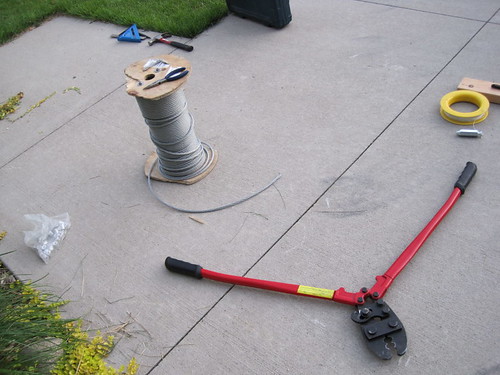
After the basic structure was built and attached to the house came everyone's favorite activity, cable swaging. We're still working on using up the original, 1000ft. spool of cable I bought to do the interior railings!
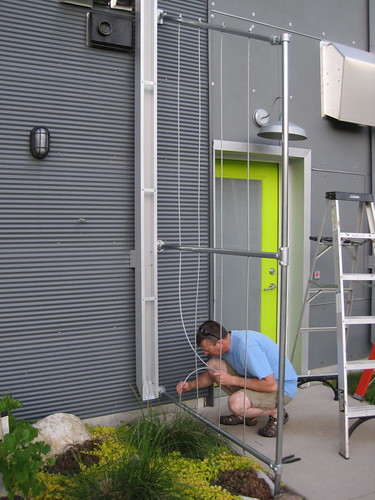
We used a plumb bob to get a straight line from the top pole to the bottom, and then drilled holes in the pipe sections so the cable could pass through:
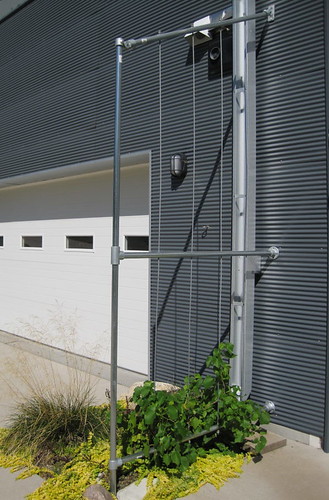
Here's the finished trellis, planted with some super MN hardy grapevines we'll hope make it through the winter.
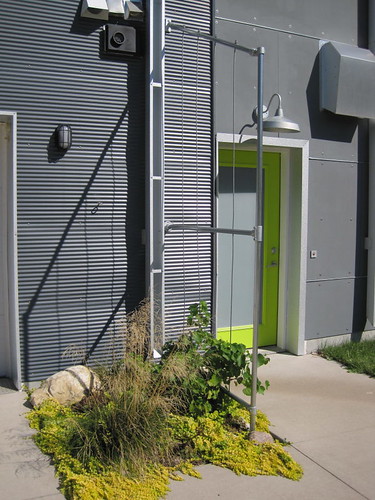
They don't look like much yet, but I've had great luck with another grapevine in a similarly hostile spot outside our patio sliders and if they take off even sort of as well as that one, we should have a lovely shady wall of green next summer.
The second step of this project is to add some kind of shade sail bit or polycarbonate "roof" section that attaches to the trellis and shelters the doorway a little, but I haven't quite worked up the ambition to tackle that yet. Maybe once the wicked August sunshine and heat ease up.
There's a tough, tough life outside our back door. It's a spot where just about a perfect storm of hostile-to-plant factors come together to make for a pretty unfriendly environment for things that grow. Unfortunately, things that grow are exactly what is needed there.
For a couple of years we had a really cool twisted baby locust tree. It did great and grew like mad and got huge and perfect, right up until it died one winter. So sad. It took me a whole year to accept it was dead, not a little bit because having to cut it down meant having to figure something else out...
Thus began the hunt for solutions to adding some green and vertical to this spot. Something super cold hardy and moisture issue-tolerant and perennial and of a not-too-big scale...which excludes most trees. Kind of a tall order once I got right down to it.
Eventually I decided I liked the lower risk, easier to plant (and remove should this plan B fail) idea of a vine of some sort and that a trellis for said vine would be an interesting way to add some dimension to the otherwise completely flat side of the house. Plus I figured if worse comes to worse and I fail again, I can always resort to a fast-growing annual vine instead.
So anyway, out came the Kee Klamp card. Because it's just too handy and cool of a product not to find a way to use.
Following one of those very non-specific kinds of plans that I seem to excel at, first I figured out what size and shape I wanted for the finished trellis. After acquiring the necessary supplies and fittings, we cut the fence post sections to the appropriate length, hooked the whole thing together and plunked it into place. As I said we went with galvanized steel fence posts which are available at the home center in 10 foot lengths and various diameters, just be sure you choose a size that corresponds to a Kee Klamp size. The actual Kee Klamp joinery is easy as can be--slip the fittings onto the pipe ends and tighten the allen screws to hold them in place. What's not shown here is that the lower section of vertical post is pounded down into the ground a few feet to help hold the whole thing in place:

After the basic structure was built and attached to the house came everyone's favorite activity, cable swaging. We're still working on using up the original, 1000ft. spool of cable I bought to do the interior railings!

We used a plumb bob to get a straight line from the top pole to the bottom, and then drilled holes in the pipe sections so the cable could pass through:

Here's the finished trellis, planted with some super MN hardy grapevines we'll hope make it through the winter.

They don't look like much yet, but I've had great luck with another grapevine in a similarly hostile spot outside our patio sliders and if they take off even sort of as well as that one, we should have a lovely shady wall of green next summer.

The second step of this project is to add some kind of shade sail bit or polycarbonate "roof" section that attaches to the trellis and shelters the doorway a little, but I haven't quite worked up the ambition to tackle that yet. Maybe once the wicked August sunshine and heat ease up.


5 Comments:
I found your blog through Re-nest, and I'm so impressed by what you've done. I'm embarking on my own voyage in the next week when we close on our own Minneapolis home (that needs lots of work). You have a new follower!
I really love this. Well done! Hmm...I wonder if I can get some sort of plant with vines to survive a North Dakota winter??
Great idea and innovation! As always a fun read....can't wait to see how the shed turned out. You guys seem to do projects that are on my 'six months from now list'.....awesome job:)
Great Project! Where did you purchase the Kee Klamp fittings? Are they available in the Twin Cities area?ve
Hi David. Check their website for a local vendor--I'm actually not sure. I ordered these online.
Post a Comment
<< Home