
My Friend the Wire Rope
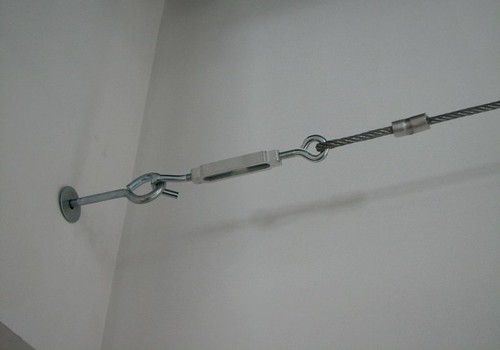
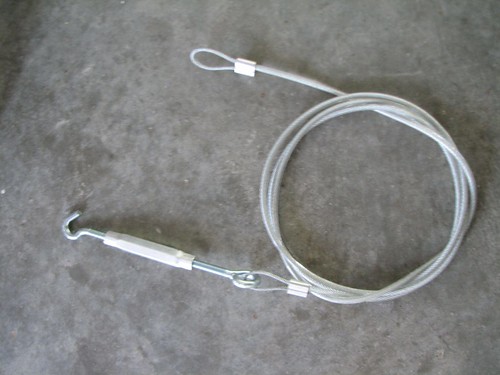
Behold the steel cable (aka wire rope), ferule, turnbuckle, and eyehook. Four of my favorite interior design secrets.
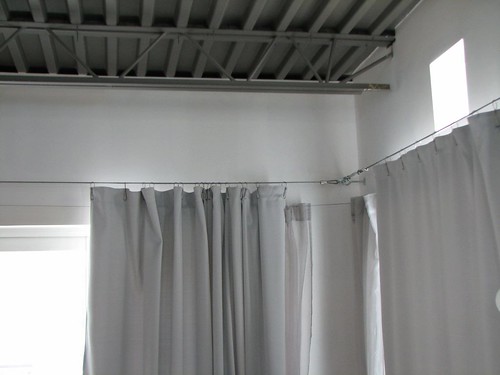
In this first application I've used these basic supplies, available at any hardware store, to construct a minimalist techie looking drapery hanging system that allows me to span a long distance, in this case both the length and width of my bedroom, with a few simple and inexpensive pieces of hardware and twenty minutes worth of effort.
Below you can see the whole set up: my DIY cable system with heavy outer drapes and under it the IKEA version of the tensioned cable, the DIGNITET, which works and looks great for lightweight fabrics or sheers but gets easily overwhelmed and saggy with a fabric that's even remotely heavy:
What's the big deal, you say?
The tensioned cable allows one to pull any number of drapery panels all to one side or another instead of having to split them to either side of larger openings because of those unfriendly center support brackets that most drapery hardware requires. And that, in my world, solves a huge and frequently encountered design dilemma that used to make me crazy.
Not your style, all those industrial looking metal bits? I've used this little trick in lots of regular houses too, except there I keep it a secret by covering it with a valance. I love love love doing this for sliding door treatments, because almost without fail, I find that sliders look much better when the panels go all to one side when open, (usually to the inoperable side so as not to interfere with traffic in and out the operable door), but that is nearly impossible with anything but a formal drapery traverse or a large diameter rod because of the dreaded center bracket. But I almost never like the look of those kinds of things or I'm doing a valance anyway and it seems stupid to go spending a bunch of money on something that's just going to be covered up.
So in situations where you have a longish distance to span and: A. you don't care for a big, decorative rod, B. you want to spend like $4 instead of $400, C. the rod would be covered by a valance anyway, or D. you like the minimalist-industrial thing, the tensioned cable is your best friend.
But it doesn't stop there.
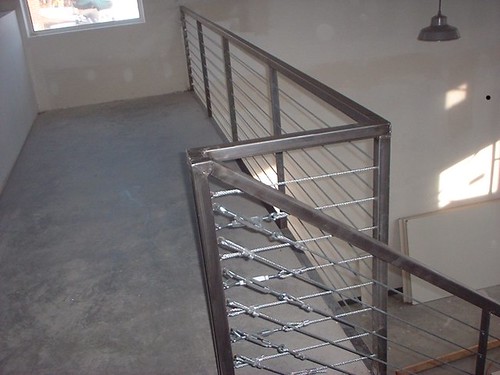
This friend also served me well in the stair and balcony railings in our house. I knew I wanted a horizontal cable rail (fortunately it complied with code here but that is not the case in a lot of areas so check first) but I didn't like the look, materials or cost of any of the commercially available cable railing systems. When I was looking, these ran on the order of $110 a linear foot and up, which at my house would have meant $10,000 minimum in railing alone. Do I need to tell you that wasn't a Modern in MN budget figure?
Instead, I had a basic steel framework welded up and installed and then spent a couple of very sweaty days wrestling 1/4" cable to do the infill myself. One thousand feet of cable, turnbuckles, ferules and the ~$300 swageing tool to put it all together cost me less than $1K, or one tenth the price of the commercially produced kits that are made from lesser materials and that I would still have had to install myself. Now THAT was definitely within my budget and I think it looks a hundred times cooler.
The basic components of a wire rope rig-up I've already mentioned: wire rope, ferules, turnbuckles and eyehooks. Four simple and cheap little piecesparts that do so much.
Wire rope comes in a whole range of gauges and construction, but unless you're hanging humans or several tons worth of stuff, don't worry about the construction or strand count of the cable. Just get some that's the size you like, keeping in mind that the skinnier stuff is easier to work with.
Most decent hardware stores will carry a range of gauges of rope that will be fine for household use. They'll also have the ferules or the little metal sleeves that are smushed in place to make a loop in the cable. It's important to get the ferules that correspond to the size cable you choose, because the ferule is all about using friction to hold things in place. Likewise, you'll also find eyehooks and turnbuckles at the hardware store, and you can choose these based on looks alone or, if you're suspending something heavy, based on duty rating which I'll discuss below.
If you want either the cable or hardware in a specialized metal, like stainless steel, check out marine supply stores or look online for "rigging" or "swaging" equipment. Stainless costs a bit more, but this is the way you'd want to go if you're doing anything outdoors or in a wet area like a bathroom.
A few words about "swageing", which is the term used to describe applying the ferule to the wire rope. Like ferules, the tool used to swage, ie the hand swager, is sold in sizes that correspond to the ferule size. From what I can tell, one swaging tool is typically suitable for two or three consecutive sizes of rope and ferules, and they also have a nice bypass cutter on one side for cutting the cable. But unless you're doing something really heavy duty with thick cable, forget the specialized tool because they're expensive. All you need to smush those ferules on and make a nice sturdy loop is a good pair of pliers and a strong grip or a bench vice that you can whack shut a few times. A heavy duty wire cutter will cut smaller diameter cables with a bit of effort. If you're using thicker gauge cable, you can ask them to cut it to length for you wherever you buy or use a hacksaw with a metal cutting blade. For the latter, wrap a piece of masking tape around the rope before you cut. This method has served me well for many wire rope projects, and again, unless you're making something that your life depends on, don't worry too much about the how and the what of the specialized tools. But for the sake of knowing our stuff, here's what a swager looks like:
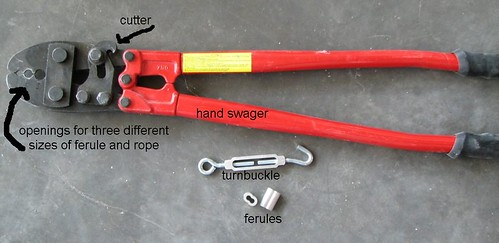
This one works on 5/16, 1/4, and 5/32 diameter cable and ferules, otherwise known as pretty heavy duty stuff. It's roughly the size of a large bolt cutter.
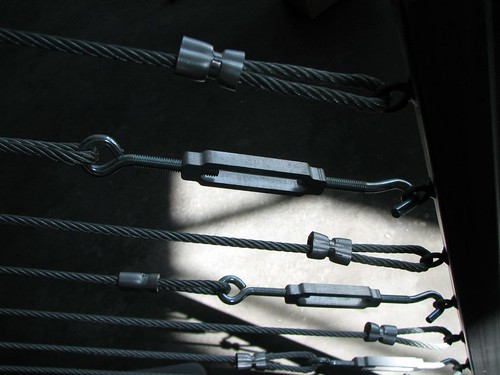
In the picture above, you can see an alternative style of turnbuckle. It works exactly the same as the open ones shown in the previous picture in that the body turns on the screw eye and hook to either shorten or lengthen itself. Turnbuckles have load ratings just like wire rope, so be sure the turnbuckle you choose has a load rating that meets or exceeds the weight of what you want to support. I tend to buy bigger turnbuckles than are necessary just because I like the way they look, but having a nice strong turnbuckle can never hurt when you're doing something that will require a lot of tension on the cables.
The picture below is of the cable railing I installed here at Modern in MN, and you can see the individual components I've mentioned. The ferules I swaged using that big fancy tool (that crimp mark on the ferule is from the swager) because these cables have a fair amount of tension on them. In a critical application, each ferule would be crimped three times, and then this gauge cable and loop could support something like 6000 pounds. Considering it took all my strength to operate the swager and that my cables have something like 1/10th that amount of tension on them at best, I opted to crimp each ferule only once:
Below is another of my favorite ways to use wire rope. In this application, I used very thin gauge rope and a couple of eyehooks to suspend an old window from two hooks in the ceiling:
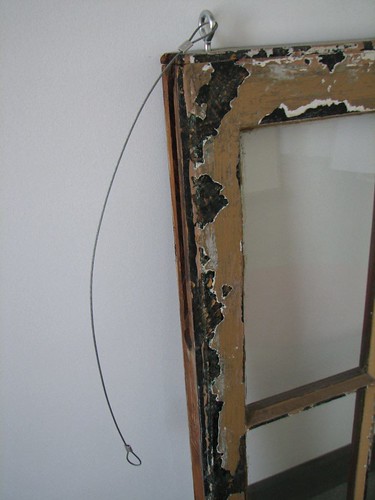
Wire rope works great for things like this because it's visually unobtrusive and it hangs nice and straight and neat looking.
Anyway, there you have it, and introduction to my friend the wire rope and a couple of ideas. Now run free and swage :)
posted by splatgirl at 12:01 PM
![]()
![]()

41 Comments:
snuck over here from apartment therapy and am incredibly impressed. Please keep writing! My girlfriend and I have a 1000 square foot space in oakland that we are working on and I love the ideas in your blog.
This...site...is...awesome...
I read from the very beginning till now, and am thoroughly impressed.
My wife's from MN, outside MPLS. If you're willing to share, whereabouts are you? Would love to see this thing in person.
I'm impressed with your wire rope and have tried it myself across a 20 foot span on our three season porch in New England. My main problem is how do you get the wire rope up and tight enough to support the curtains? I cut the wire rope to the length between the two turnbuckles but because of the weight of the curtains on the 1/8 inch rope there was still a sag, even though I had a really hard time getting the wire rope to even stretch to the two turnbuckles. How do you get the rope so level without sagging?? I'd appreciate any recommendations, thanks.
Hello Anonymous
I think I would try using a heavier gauge rope and/or a larger turnbuckle. I've spanned 25 feet or more with little to no sagging. A larger turnbuckle would give you the ability to take up more slack. Another possibility would be to use more than one turnbuckle, say one on either end of your rig.
Also consider that your swaged loops stretch quite a bit once the rope is tensioned and they're pulled out of their natural bend. You can either pre-smush them with a pliers or use those curved metal teardrop shaped bits that go inside the loop to prevent it bending out of shape.
This is a great explanation of wire cables - I'm going to try it in a place where I need drapes to go a long distance and sweep to one side.
I have a question, though. On one end, I can follow your model. On the other end, I think I need to hang the hook from a beam vertically, instead of extending it from the wall horizontally. Given the tension involved, do you think this will work?
Hi Vicki
I've tried doing what you describe and never really gotten it to work using just eyehooks. Even a very big, sturdy looking eyehook will bend when placed at a right angle to the tension of the wire rope.
I do think there IS a way. If you can sink the straight part of the hook completely into your beam so that just the eye is sticking out, that might help, or maybe try using some kind of angle bracket or stanchion that has a base to support itself (much like the IKEA Dignitet end brackets)and prevent it from bending under tension.
Attaching an iron pipe flange to the beam and threading a short length of iron pipe into it to act as a support sleeve for the eyehook comes to mind but I haven't tested that one!
My typical approach in this situation is to stand in the hardware aisle and meditate until the seemingly perfect combination of parts presents itself and then go back to the store and try again when plan A fails :)
About the eyehook-hanging question - Thanks! I will head off to the hardware store and see where my meditation gets me. I have other things to finish in this space first, but when I get to the curtain project this summer I'll let you know how it goes.
I have been searching the internet to find someone to install the wire railing like you have pictured in your blog here. I have a nitemare home remodeling project and we want to move back in. One of our many things left to do is the railing for the decks. Who welded the frame for your railings.. could you be for hire to string the wiring for us???? We are located in the eastern suburbs.
- Kim
Hi Kim. Please contact me at splatgirl at gmail dot com to discuss this.
Our railing framework was fabricated on site by BW Welding and Fabrication out of Hutchinson who I can highly recommend.
This is just what I've been looking for! I have one question though, what diameter of wire rope did you use to hang your curtains? I can't decide between 1/8" and 3/16" for hanging my own curtains. The 1/8" seems to wimpy but the 3/16" seems overkill. Thanks!
Hello Jenn!
I used 1/4" because I already had everything I needed...leftovers from the railing cabling adventure.
I'd just choose whatever you like the looks of best.
You are my new hero. What an amazing DIYer! (omigosh did I just use a blogger word?)
The wire rope is a revelation for me. At times, I'd like to close off parts of my apartment. Like when I'm watching TV, like to close off the kitchen. I think I might use this idea.
Can you tell me, can these wires be strung secure enough to hold clothes in a closet?
Hi Peggy
Yes, I think you could get it to work as a clothes rod if you don't mind the turnbuckle(s) being there too. Like almost any wire rope rig of this sort, you need to have the end points fixed into someting solid like dimensional lumber (a stud) or concrete. After that, the amount of tension you can apply to the rope is limited by the duty rating and size of the turnbuckle, but I've never NOT been able to get enough tension using whatever random size turnbuckle I've chosen.
The only real difficulty in this regard comes when you're not able to place your end points parallel to the rope for whatever reason. Concocting a way for a right angle to be able to withstand the rope tension can be tricky (see above comments to Vicky).
love what you have done with the wire cable. I am considering doing the same, just have to get the "official okey dokey" from my wife if she likes the railings... I am going to have indoor as well as outdoor railings, and as you said, 100++ per linear foot is ridiculous. I was thinking regulas steel frames, then paint them with automotive paint, then adding the cables. You can see the little progress we have done at mymodernhome.wordpress.com We have just recently begun work, and as you I am looking at saving $$ as much as I can. Project timeline is only 3 to 4 months. My GC (a very good friend of mine) just did an addition larger than the one I am doing and has done it in less time. He also lives across the street from me, so getting it done is adventageous to him!
Anyway, check out the site and let me know what you think about the design, as well as any suggestions you may have.
By the way, I love what you did with the bathroom tile!! I am doing one of the bathrooms myself (and the new 1/2 bath) as my "project".. I already have my old 50's yellow tub ready to come out!!
I am going to do white subway tile in a straight pattern (not bricked). More than likely absolute black counters (tile, not slab, $$$ saving!!), trying to figure out what to do on the floor so it will be modern w/o being white/sanitary.....
Anyway, your help is greatly appreciated..
Mikey
mgamach1263@earthlink.net
I love your use of hardware.
I was googling this exact idea and came here from the search.
Love the house and design. beautiful.
so I'm copying down the stuff.
As I was reading I thought it would be cool to do a layered look too, like the panel hanging systems are done (if you don't need everything going to the side. You could put up six feet on the ceiling, then over lap a half foot say and do another 6 feet, and then under lap from that one... in line with the first... etc. all across the room. might be nice and dramatic for some applications.
also thought maybe hang one to hang art from like the gallery cable systems that I so can't afford.
Anyway, love the stuff, your stairway is fab.
OOPS, me again, I just had an idea about doing two layers, one for half/cafe style curtains so you can still have privacy and let the light in, but at night you can draw the second layer.
do you think you would need two different
sizes of hardware so one wouldn't be pushing against the other?
hmmm
time to go to home depot and meditate.
Thanks again.
Is there a way to do friending or bookmarking a site on blogger?
That is one of the reasons I wind up not using it and stay at Live Journal.
Great write-up, my wife and I are planning to hang drapes like this. One question, what are you using to attach the drapes to the cable?
Thanks
i landed here after searching for cable displays (roughly), and this is a great tutorial! i remember seeing the kit at Ikea and just don't know that i'll go that route...i just began working as a K-5 art teacher and plan to use wire rope lines to display student art in my classroom! thanks for all the great info!
i was wondering would this work on wood paneling and had no studs in the wall
the cable needs a fair amount of tension in order for whatever is hanging not to sag, so the eyescrews really need to be into something solid. You could try it with a big toggle anchor behind the paneling, but I guess I wouldn't.
What a great site and ideas!
I have outdoor gazebo with a span of 144 inches. I want to use custom grommet type drapes that are made from sunbrella fabric. Will cable system work with heavy fabric? will they work with grommet type drapes?
Any feedback would be great
Jeff
Hi Jeff
Yes, and yes.
Just a quick question....Could the cabling be used for a wall treatment for a wedding? Would it be strong enough for sheers across the lenght of the wall. The sheers would be thrown over the top of the cabling so it would be doubled and then gathered somewhat for fullness. Would be anxious to hear your opionion.
thank you,
Catherine
probably would work, yes.
Hello,
I'll be using unlined drapery fabric in 7 yard length panels to hang from the wire I am going to install and I'm wondering what type of drapery clips/rings you used and/or others you might suggest that work well and have a complementary industrial esthetic.
Thank you,
Soad
hello Soad
I'm partial to cheap. Anywhere that sells hardware should have about the same selection of stuff, it just depends on if you want to sew on rings or not, what finish you like and how much hardware you want to see. The ring/clips from IKEA are good, and also I have the ones from there that look sort of like paperclips on my bedroom panels. Those I had to sew in place. They also have just clips that attach to the cable via wee s hooks if you want something unobtrusive. I think they are part of the dignitet line.
Wow. Love your site, which I found while trying to figure out a modern baseboard for our addition-from-hell. (hausaufgoblin.blogspot.com) I've also been grumbling about the overpriced Feeney Cable Rail option for our green roof's balustrade when a friend said to have our local steel shop (who made our steel beam for $280) do the frame. Our copper siding guy has already offered me free SS cable off the old mast of his boat which bit it during Hurricane Isabel. Now I have the missing piece - how to do this. Reading your blog is such a treat and I've been there on the mosaic tile front. Keep up the cool stuff - it's great inspriration!
-d.
Hey splatgirl,
This is a really great post. Do you think this will work if I am putting the eyehooks into the ceiling? My ceiling is concrete and I think it'll hold up much better than putting it into the drywall.
Thoughts? Thanks!
Hi Vincent. Please see the previous comments WRT tensioning a cable perpendicular to the eyebolts vs. parallel to them. I have never been able to get this to work without bending them, so at the very least, I would consider using some kind of bracket with a brace.
Thanks for the great description here on how to use "wire rope." I am setting up a photography studio in the basement of my home and was looking for ideas of how to hang backdrops. Google search = Wala. Thanks!
I have a patio cover over my deck. Spans 13 feet out. The patio cover is mounted against the wall of the house (aluminum siding) and the opposite side of the patio cover is supported by a large I-Beam on posts mounted on the deck. I'm guessing if I don't hit a stud in my house wall that I would need to put in an anchor. But my bigger concern is if I have the tension of the wire rope coming off the I-Beam, will that make my deck cover/posts come tumbling down? Is there a way to send you photos for you to get a better understanding? I plan on hanging heavy sunbrella fabric on the line. Thanks for your help!
You NEED to have the mounting points into something solid. Under no circumstances is just an anchor behind siding and sheathing going to do it. Beyond that, I don't think I'm qualified to answer. Sunbrella is pretty heavy and the cable supporting it will need a decent amount of tension to not sag...
Also keep in mind that you have the added stress of wind pulling on everything.
I don't know exactly how i came across this page but Thanks for your clear explanation. I'm hanging a golf net and this is perfect and easy!
Thanks for posting this! I was thinking of getting the IKEA system out of sheer indolence. But now that you've suggested what a simple matter it is to DIY it, I might just do the same.
Still replying to questions about the wire tension system? If so, what size wire and what size turnbuckle would you use if you were trying to do a 17' length wire that will be hanging sunbrella drapes? Also, what size grommet do you think I will need to be able to go over the turnbuckle and eyebolt? Thanks for any help.
Still answering questions about this subject?
hello anon
In the realm of 1/4" rope and hardware, if it were me.
You will find that there are limited options for grommets, and probably none that have a large enough diameter hole to pass an appropriately sized eyebolt or turnbuckle unless you like the plastic ones.
In any case, you can thread the drapery on to the rope and swage the loops afterward.
As you've been working with this versatile gear for a while, am wondering if you've come across a mechanism that can safely release the cable from the end bracket at a critical point of tension, allowing you to reattach the cable without fuss or damage to anchors and curtain.
The backstory - I'm developing a blackout curtain to run along the side of a pod style bunk bed arrangement at a new backpacker hostel. The curtain fabric has already been prepared (just looped and sewn) Any ideas?
Cool uses of the wire rope on your drapes. First time I've seen that!
Where did you find the black open frame turnbuckles in the Picture? I'm not finding any in Black. I've found some 1.5 mm sold as fishing trace in black & there is plenty of PVC or nylon clad cable in black but s0o far I'm not finding many fittings Thanks in Advance David
The turnbuckles are all aluminum/steel, so silver. I have never seen them in a color, though you could probably spray paint or powder coat them if you are careful to keep the coating off the threaded bits. Or maybe (carefully) paint them once installed? I suppose anodizing would also be an option to get black...
Post a Comment
<< Home