
Table and Associates
I'm just catching up a bit on project updates around here and realized I never showed you the fully completed cool red casters table and associated project, so here you go:
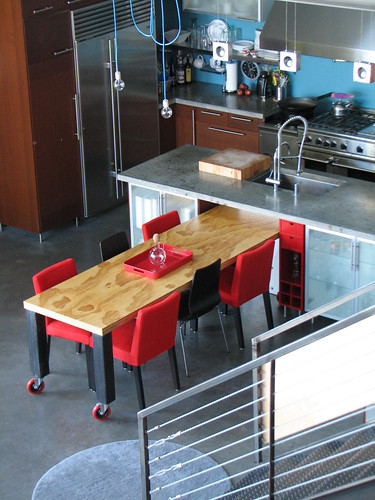
I was able to decide upon and purchase eight new chairs just in the nick of time for Thanksgiving, and with the table pulled out from it's nook and another two chairs placed on either end, we were able to seat 10 comfortably. That's still two seats shy of my original dream for this space, but I guess I can live with it since big sit down dinner parties here will likely be occasional at best.
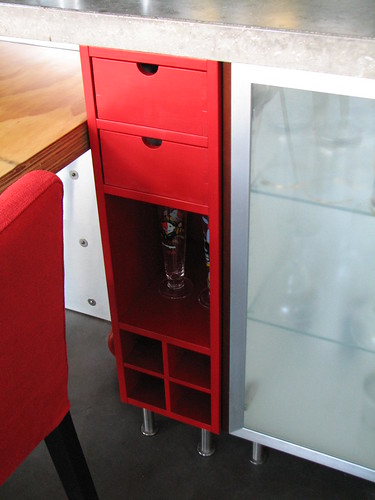
The red cubby is IKEA's PERFEKT, transformed from its stock wood veneer finish with the same color paint I've used on a few of the walls, Valspar's Starfire Red. It came out surprisingly well and I think it really helps to tie the whole table, sideboard and island area together.

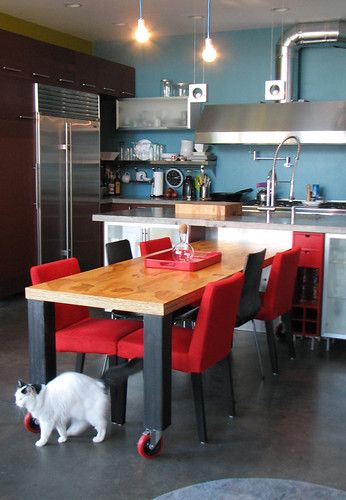
A return to fabric-upholstered furniture means LittleKitty has staked her claim and that puts me solidly back in the furniture vacuumer's club. A bit boo, but I'm loving the red chairs none the less. They're IKEA's HENRIK and they're slipcovered which appeals to my itchy decorating feet. They're also comfortable, an important and often overlooked dining chair issue IMO. The other chairs are IKEA's GILBERT, also surprisingly comfortable and stackable so I can store the two you don't see here all tidy and compact-like.

And the added bonus from the table building project, two of these nifty, sturdy benches on wheels for flexible seating or coffee table duty. I've got the supplies to make pads for them but haven't managed to get to it yet.
So I guess I'm calling this project done. Still on the kitchen/dining to do list is deciding on and installing a backsplash. Gotta let that one simmer a bit more I think...
I was able to decide upon and purchase eight new chairs just in the nick of time for Thanksgiving, and with the table pulled out from it's nook and another two chairs placed on either end, we were able to seat 10 comfortably. That's still two seats shy of my original dream for this space, but I guess I can live with it since big sit down dinner parties here will likely be occasional at best.
The red cubby is IKEA's PERFEKT, transformed from its stock wood veneer finish with the same color paint I've used on a few of the walls, Valspar's Starfire Red. It came out surprisingly well and I think it really helps to tie the whole table, sideboard and island area together.
A return to fabric-upholstered furniture means LittleKitty has staked her claim and that puts me solidly back in the furniture vacuumer's club. A bit boo, but I'm loving the red chairs none the less. They're IKEA's HENRIK and they're slipcovered which appeals to my itchy decorating feet. They're also comfortable, an important and often overlooked dining chair issue IMO. The other chairs are IKEA's GILBERT, also surprisingly comfortable and stackable so I can store the two you don't see here all tidy and compact-like.
And the added bonus from the table building project, two of these nifty, sturdy benches on wheels for flexible seating or coffee table duty. I've got the supplies to make pads for them but haven't managed to get to it yet.
So I guess I'm calling this project done. Still on the kitchen/dining to do list is deciding on and installing a backsplash. Gotta let that one simmer a bit more I think...
posted by splatgirl at 1:30 PM
![]()
![]()

16 Comments:
I just discovered your blog and your work is really amazing! I've very much enjoyed reading through the archives.
A question on the benches - how did you attach the legs to the top? Did you just use glue or are there screws hidden in there somewhere?
Hello!
Everything is glued and screwed.
I used glue plus four long deck screws per leg to attach them to the bench surface from the top, before adding the middle and top layer of plywood.
Great blog, I've just discovered it and am enjoying reading about your progress. As a modern house gal stuck in the suburbs, I'm curious about where in the twin cities did you build and what do you neighbors think? I'm not sure if you are going to share that information, but I had to ask.
Hello Mrs. O, and thanks.
We used to get a lot of "What is this anyway?", or my favorite "what did this used to be?"
I think it helps that we built in an old suburb where there is the kind of architectural diversity that you get when a place grows up from nothing over the span of several decades and bears the marks of how people have lived during those times, vs. someplace like Woodbury or Maple Grove that didn't exist prior to 15 or 20 years ago and where the style is exclusive and strictly policed to conform to "late 20th century fast, cheap and big".
I'm sure we have plenty of neighbors that wonder about us in the same way we do about them, i.e. why in the world would anyone choose to live in that (McCrackerbox developers beigeville)?
But I also harbor some arrogant hope that we've inspired at least a couple of people to rethink...or to think.
Too Funny....we live in Woodbury and I feel the same way. In fact, sometimes we get friends that turn into the neighbors out instead of our because they can't tell the difference. But we had little kids when we moved and its great for them. But when they are gone something more unique is for sure in our future. Hindsight is indeed 20/20.
Desmodromic valve cams and Ritzenhoff bierglas? Excellent taste!
I love the table - so much in fact that we built a kitchen island just like it last week. I just need to seal it... but I am struggling with all the little tiny holes on the cut sides of the plywood top. Did you fill these, then sand and finish them - or just ignore them! Thanks.
hello erin and adam
I filled all the little holes in the exposed edges with wood filler and then went back and sanded whatever got left on the edges so you can't see it. This is also a great way to secretly fill in any little gaps between the layers if they're there.
And a side note...I'm totally amazed how the marine spar urethane is impervious to water. One of our cats spilled a cup of water and a puddle sat overnight on the table top and it didn't do a thing. Oil based so it stinks and sucks to work with, but def. worth the extra effort, and I wouldn't hesitate to use this combo of materials for a countertop, even one that's constantly being exposed to water.
hi there,
i too just discovered your blog -- great ideas, as we're just starting a diy project of our own. can i ask where you got that amazing handrailing or did you weld it/wire it yourselves?
thank you!
Hi
I had a welding shop fabricate the framework and I did the cable infill. I talked about it fairly extensively with material sources and how-to, etc. in an older post.
Beautiful kitchen and love your website! I love those pendant lights (the square ones). Are they ikea hacked as well? Tell me more!
do you mind answering few questions about your concrete floor? we would like to have similar one in our new home, was wandering how you achieved this look? was there any staining or grinding, pigment addition involved?
thanks
Hi Brankulo
It's just concrete, straight off the truck. No colorant or staining or grinding. In flatwork speak, it's a hard trowled, or power floated finish. Any competent flatwork contractor will know what you want, but those who do commercial work in particular will be best at it, since it's the same thing you'd see in any big box store.
thanks, what about sealant? i assume you used one, how many coats you did?
did you do any final polishing?
Odd questions, but I was just wondering what the pilsner glasses are called that are in your red cubby. I gave a set as a gift years ago and would love to get more but I don't know what they were called or the artist.
thanks! nice job, by the way! :)
They are Ritzenhoff--the line was made up of glasses designed by individual artists, so they are all different
Post a Comment
<< Home