Oven Floor and Going Up
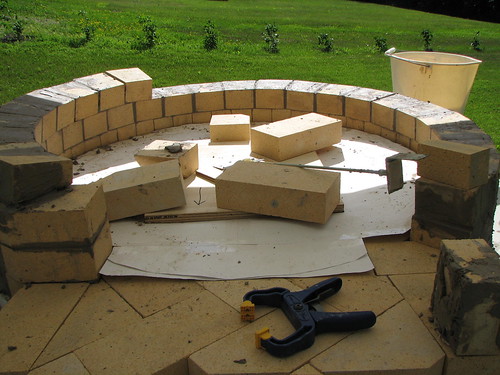
Here's the hearth bricks cut and ready to set on the insulation base:

I'm building a 36" diameter oven so I just cut a paper template for that plus the area covered by the vent opening and landing, laid out a grid of bricks and then traced the pattern onto them to mark the cuts. It's recommended these hearth bricks be set in a herringbone pattern to make it easier to slide a pizza peel across the surface without catching.
Placing and leveling the hearth bricks on the insulation took a bit of time and a couple of do-overs. The ceramic fiber insulation board I purchased was claimed to be a flat, consistent surface but that was not at all what I received. Like At. All., which was sort of annoying, and I ended up having to put a layer of vermicrete (vermiculite+portland cement at about 8:1) on top of it plus a dressing of brick dust before I could set the hearth. So much for favoring time savings over cost. I'm sure the ceramic fiber board will be a fantastic insulator, but it ended up being a bit of a pain in my butt.
Anyway, on to the fun stuff! From here it's been a wet, dirty activity this brick laying business.
As suggested by some of those who have gone before me, I purchased a tool called "The Angleizer" to help me figure out the shape of the bricks for each circular layer. It's like four sliding, adjustable rulers attached together. Basically, you plug the diameter of your circle and the size of the bricks into a little computer program and it spits out the measurements of the trapezoid shape for the bricks in each course. Then it's just a matter of setting the tool accordingly and marking and cutting each brick. For a mathematically challeneged person like me, it makes things a whole lot easier.

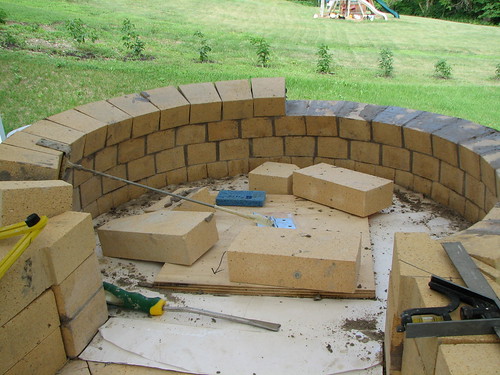
Another handy, not thought up by me concoction is the rod and angle bracket tool you see. There's lots of ways one could make this tool, and I cobbled mine together with a hunk of threaded rod, some repurposed IKEA parts and a hinge. It's set up to turn 360 degrees and through a 180 degree arc. The angle bracket fixed to one end allows each brick to be set at exactly (or close enough) the right pitch and distance from the center, ensuring a perfectly-ish circular, dome-shaped dome. Another super deluxe time saver, plus it holds the brick in place for as long as necesary until the mortar sets up.


I'm building a 36" diameter oven so I just cut a paper template for that plus the area covered by the vent opening and landing, laid out a grid of bricks and then traced the pattern onto them to mark the cuts. It's recommended these hearth bricks be set in a herringbone pattern to make it easier to slide a pizza peel across the surface without catching.
Placing and leveling the hearth bricks on the insulation took a bit of time and a couple of do-overs. The ceramic fiber insulation board I purchased was claimed to be a flat, consistent surface but that was not at all what I received. Like At. All., which was sort of annoying, and I ended up having to put a layer of vermicrete (vermiculite+portland cement at about 8:1) on top of it plus a dressing of brick dust before I could set the hearth. So much for favoring time savings over cost. I'm sure the ceramic fiber board will be a fantastic insulator, but it ended up being a bit of a pain in my butt.
Anyway, on to the fun stuff! From here it's been a wet, dirty activity this brick laying business.
As suggested by some of those who have gone before me, I purchased a tool called "The Angleizer" to help me figure out the shape of the bricks for each circular layer. It's like four sliding, adjustable rulers attached together. Basically, you plug the diameter of your circle and the size of the bricks into a little computer program and it spits out the measurements of the trapezoid shape for the bricks in each course. Then it's just a matter of setting the tool accordingly and marking and cutting each brick. For a mathematically challeneged person like me, it makes things a whole lot easier.

Another handy, not thought up by me concoction is the rod and angle bracket tool you see. There's lots of ways one could make this tool, and I cobbled mine together with a hunk of threaded rod, some repurposed IKEA parts and a hinge. It's set up to turn 360 degrees and through a 180 degree arc. The angle bracket fixed to one end allows each brick to be set at exactly (or close enough) the right pitch and distance from the center, ensuring a perfectly-ish circular, dome-shaped dome. Another super deluxe time saver, plus it holds the brick in place for as long as necesary until the mortar sets up.

Labels: wood fired oven building


4 Comments:
Hi Splatgirl,
Love your blog and flickr sites!! Not to sound weird from a total stranger, but I've been greedily culling ideas from your photos for my own modest bathroom renovation. If you don't mind my asking, where did you find the glass gems for your bathroom wall and floor? I've never seen the larger ones, but I love the random placement of the rounds. Did you place each gem individually, or was it somehow all taped together, then placed on the wall? (I assume they were NOT bought ready-made--right?)
Many thanks in advance for any tips you can provide!!
--D
Hi
The blobs were mostly from the craft store. They're sold in mesh bags by the floral stuff. I also bought some in bulk from http://www.wholesalersusainc.com/glass-gems-marbles-c-58.html
because they were cheaper that way and I needed A LOT, plus I had sort of bought out all of the supply locally. There's tons of places that sell them online if you poke around.
They're all individually set. I tried setting them on mesh first but it showed through the transparent ones so I had to abort on that method. If you used a more opaque type it would probably work just fine.
So funny...here I am building a little house, thinking, "gee a wood pizza oven would be cool"
Then I find this site.
Nice!
Can you tell me what "little computer program" you used to calculate the brick sizes?
Thanks
Shawn
its called "the angleizer", and really it ends up screwing you as much as not after a couple of courses. there's about eight gajillion ways that people have figured out to accomplish this and the whole build, actually...check out the forum at fornobravo.com if you want to read up on it. there are guys there who put the whole oven spec into a cad program and basically get dimensions for every single brick in every course, and there are people who've built their entire oven using just a hammer and chisel to cut their bricks and not ever measured a thing. same end result, so it just depends on how anal you want to be. only about 10% of it ends up being visible anyway.
Post a Comment
<< Home