Discussing the Details: Concrete Ofuro
The idea of a concrete soaking tub is one that seems to generate a fair amount of interest, so I decided to dedicate an entry to describing how we went about constructing ours.
Despite what were obviously serious doubts on the part of our plumbers (and others, come to think of it...), the concrete ofuro has turned out to be a HUGE success. I really could not be more pleased with the end result and I can't wait to dip my toes in. After the craziness of the last year and a half, I need it!The specifics: Outside dimensions of the tub are 42"L x 42"W x 36"H The walls are 4" thick rebar reinforced concrete. The seat inside is about 13" high and the back is slightly reclined for comfort.
As with any concrete pour, the formwork is what really matters and what takes the most time. This was my first foray into anything cast concrete, but you'll recall, I've just built a concrete house so I had plenty of opportunities to pay attention in class during the course of that work and I never missed an opportunity to ask questions and learn about the material.
Here's the form, ready to go:
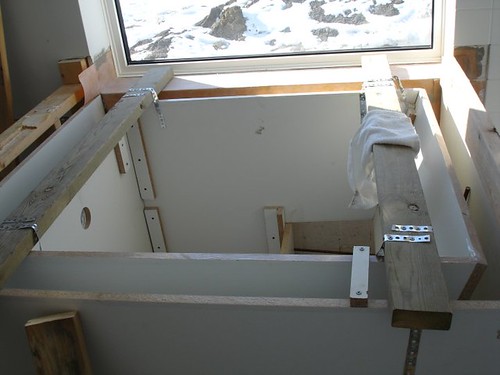
The inner and outer form panels I made using 3/4" melamine. This was basically just an exercise in visualizing negative space and a lot like forming a stoop, although slightly more complex. What required the most thought here was figuring out how to hold all of the panels together, not screw through the inner melamine surface, and still be able to get everything apart and out once the concrete hardened. I used blocks of scrap melamine screwed together in a lengthwise "L" and then screwed to the form panels.
I also braced the melamine panels with scrap lumber to keep them from bowing and reinforced the corners with plumbing strap.
Because the tub needed to have a floor, the inner form needed to be held up higher than the outer form. This was accomplished by basically hanging the inner form from the walls of the outer form, again using scrap lumber and plumbing strap.
Regarding the plumbing rough in: I had the drain roughed in slightly lower than the intended height of the tub floor to allow for a pitch of about 1/4"/foot for drainage. The overflow pipe was roughed in so that it ended up within the 4" thickness of the tub wall. You can see the circular hole in the form wall in the pictures. This is the PVC collar that the chrome overflow trim screws to, and the flange of this PVC piece fits into and extends just slightly into that hole to prevent concrete from filling the overflow.
I had originally planned on getting ready mix for the tub and the concrete counters, and pouring all of this stuff at once. Fortunately, I came to my senses and realized that was going to be WAY too much of a panic to worry about all at once, and I decided it would be better to DIY our mix using bagged materials. I was also concerned about having very tight control over the amount of water in the mix, and I decided that ready mix would be too unpredictable and likely too wet.
I rented a portable, electric mixer for this event which turned out to be not as useful as I had hoped. We found that mixing two bags of material at a time using a wheelbarrow and mason's hoe worked a lot better. Having two great friends there to lend a hand was a huge bonus as well. Here's the form all filled, showing the slanted back and the bracing inside. The cross pieces with the strapping on them are suspending the inside form off the floor.
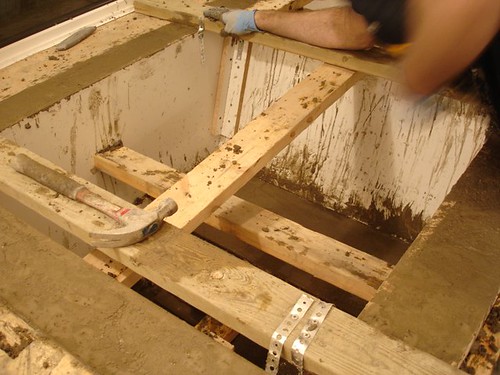
It was helpful that we were pouring up against an existing wall, as that was one less side of form to have to brace and worry about keeping square. There was also a temporary wall on the supply side of the tub (built to soothe the plumbers and give them somewhere to place their rough-in), that provided a backer to a second side of the form. The other two sides we braced to the walls of the bathroom, shown here:

Any good concrete guy will tell you you can never go overboard with bracing. A yard or two of wet concrete all over the floor inside the house would have been a huge drag, and while we got a little bowing, the bracing and form reinforcements did their job.
In this regard, our slow process of mixing a few bags of material at a time, by hand, was a boon as it allowed us to keep a sharp eye on the form and make adjustments to the bracing as necessary. We also made an effort to mix the concrete with as little water as possible, both because of the effect of this on the cured product and because less water equals less pressure on the mold.
Here's a shot of the newly de-molded tub. The concrete is still slightly wet and very green. We've also removed the temporary pony wall here, and you can see the water supply lines.

posted by splatgirl at 11:09 AM
12 comments
![]()
![]()