Pergolicious
Another fall, another fall house project, (another day, another new post!) and since there's now a foot of snow on the ground, obviously I'm a little late on full report.
It's kind of a shame, but I'll admit that I sort of pine all summer for the cooler weather of fall even though it means winter is just around the corner. I love summer, but this year it was all hot, all the time, and mother natures' 2012 zero-tolerance-for-anything-moderate policy was a real hindrance to outdoor labors. For anything that needed to happen on the south side of the house, it had to be fall or it wasn't happening, and even then, it was pretty excruciatingly hot.
You'll recall fall of 2011 brought us the the shed. This year it was a pergola, and I'm ridiculously excited to have gotten a big chunk of work in on adding another great outdoor space, and to have made another step forward on the road to making real life look like what's in my head.
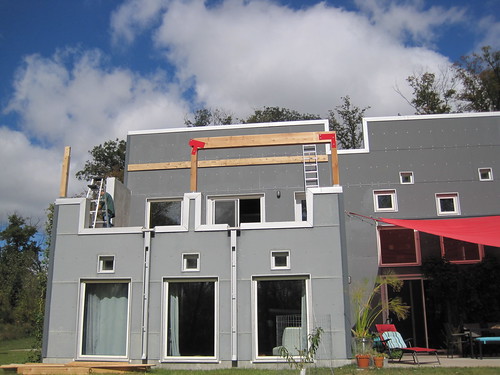
Here's my preliminary sketch of the space up for pergola-ing. It's our south-facing lower roof deck, and it's been slated for an outdoor room since minute one:

As with most of our projects, planning and deciding just what we wanted took up the biggest chunk of time. And I say "we" but really I mean me. Boy's default answer when it comes to anything like this is always "whatever you think", which is equal parts awesome and annoying. Because just like any other design/build project where we're the boss, there were a million variables and what if's to sort through and decide on. It's my favorite part and my perennial nemesis all at the same time.
My default method of making a list of priorities at least provided a place to start. Here it is:
Awesome looking. Pergolas are patently traditional, but with the right tweaks, also modern.
Shade. Hopefully a means of shading in summer and exposing in winter.
Greenhouse. It would be nice not to have to turn our living room floor in front of the sliders into seedlingville every spring.
Bug free. Mosquitoes at our place are the size of pterodactyls.
After some fact finding, research and inspiration hunting, I took a deep breath and moved on to figuring, sourcing and ordering lumber and fasteners and having some steel joining plates made. After agonizing over design decisions and construction details, this was the quick and easy part of the job.
Once our supplies arrived we got right to work. Fall lights a fire under our butts like that.
The entirety of weekend one was spent mounting the post brackets on the parapet walls and a ledger board on the house, activities notable for nothing other than being boring, hot and tiring. Gotta love that drilling and anchoring into solid concrete thing.
By comparison most of the rest of the project was easier. Everything else happened in another single weekend plus a couple of evening hours after work which amounted to a pretty quick and simple project, for us anyway.
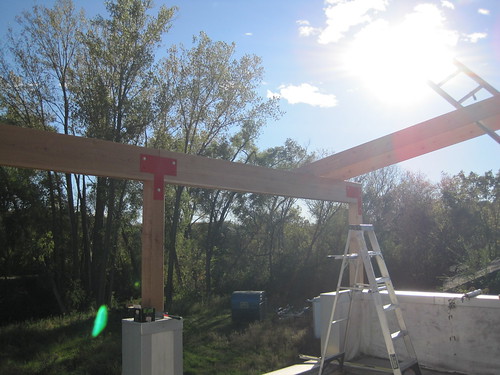
Here's weekend number two, day one, installing the vertical support posts and the headers at the eave end:
And later that afternoon, the finished post and header structure at the eave end with the first couple of joists installed:
What you can't see is what took the most time--the tops of those posts cut and chiseled to make a ledge on either face with a tongue in the middle to support and attach the headers and the ends of those joists oh-so-carefully cut to the correct angle, each with a pair of notches to fit snugly over the headers. Did I mention I sort of hate carpentry? But thank you, cedar, for at least being relatively lightweight and easy for the two of us to handle.
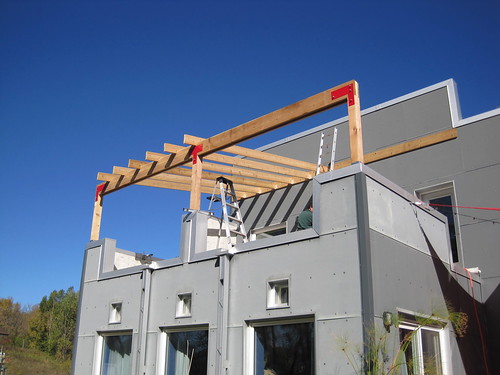
Here's a shot of a few more joists installed:
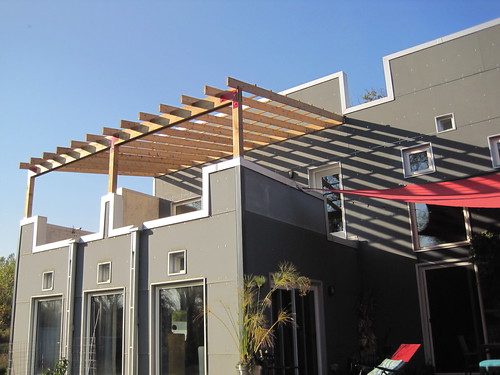
And the full contingent of joists plus the 2x2 cross pieces installed on the top, with the whole deal making shade as advertised:
With motivation and luck, we'll get a (transparent) roof, screening and railing up there before things heat up too much this spring, along with some version of Roman shades for keeping things cooler. Along with that, that my grand plan is to put a greenhouse up against part of the house wall with the hope that I can grow cool weather crops in there year round. At the very least, that element should be able to take over from the living room floor as the spot where I get my garden seeds started.
It's kind of a shame, but I'll admit that I sort of pine all summer for the cooler weather of fall even though it means winter is just around the corner. I love summer, but this year it was all hot, all the time, and mother natures' 2012 zero-tolerance-for-anything-moderate policy was a real hindrance to outdoor labors. For anything that needed to happen on the south side of the house, it had to be fall or it wasn't happening, and even then, it was pretty excruciatingly hot.
You'll recall fall of 2011 brought us the the shed. This year it was a pergola, and I'm ridiculously excited to have gotten a big chunk of work in on adding another great outdoor space, and to have made another step forward on the road to making real life look like what's in my head.
Here's my preliminary sketch of the space up for pergola-ing. It's our south-facing lower roof deck, and it's been slated for an outdoor room since minute one:
As with most of our projects, planning and deciding just what we wanted took up the biggest chunk of time. And I say "we" but really I mean me. Boy's default answer when it comes to anything like this is always "whatever you think", which is equal parts awesome and annoying. Because just like any other design/build project where we're the boss, there were a million variables and what if's to sort through and decide on. It's my favorite part and my perennial nemesis all at the same time.
My default method of making a list of priorities at least provided a place to start. Here it is:
Awesome looking. Pergolas are patently traditional, but with the right tweaks, also modern.
Shade. Hopefully a means of shading in summer and exposing in winter.
Greenhouse. It would be nice not to have to turn our living room floor in front of the sliders into seedlingville every spring.
Bug free. Mosquitoes at our place are the size of pterodactyls.
After some fact finding, research and inspiration hunting, I took a deep breath and moved on to figuring, sourcing and ordering lumber and fasteners and having some steel joining plates made. After agonizing over design decisions and construction details, this was the quick and easy part of the job.
Once our supplies arrived we got right to work. Fall lights a fire under our butts like that.
The entirety of weekend one was spent mounting the post brackets on the parapet walls and a ledger board on the house, activities notable for nothing other than being boring, hot and tiring. Gotta love that drilling and anchoring into solid concrete thing.
By comparison most of the rest of the project was easier. Everything else happened in another single weekend plus a couple of evening hours after work which amounted to a pretty quick and simple project, for us anyway.
Here's weekend number two, day one, installing the vertical support posts and the headers at the eave end:
And later that afternoon, the finished post and header structure at the eave end with the first couple of joists installed:
What you can't see is what took the most time--the tops of those posts cut and chiseled to make a ledge on either face with a tongue in the middle to support and attach the headers and the ends of those joists oh-so-carefully cut to the correct angle, each with a pair of notches to fit snugly over the headers. Did I mention I sort of hate carpentry? But thank you, cedar, for at least being relatively lightweight and easy for the two of us to handle.
Here's a shot of a few more joists installed:
And the full contingent of joists plus the 2x2 cross pieces installed on the top, with the whole deal making shade as advertised:
With motivation and luck, we'll get a (transparent) roof, screening and railing up there before things heat up too much this spring, along with some version of Roman shades for keeping things cooler. Along with that, that my grand plan is to put a greenhouse up against part of the house wall with the hope that I can grow cool weather crops in there year round. At the very least, that element should be able to take over from the living room floor as the spot where I get my garden seeds started.
posted by splatgirl at 9:10 AM
0 comments
![]()
![]()