Sunday, February 27, 2005

Start of Lower Level

We felt a hurdle had been overcome when we finally moved out of the dirt and into the air and our lower level walls started to be stacked into place.

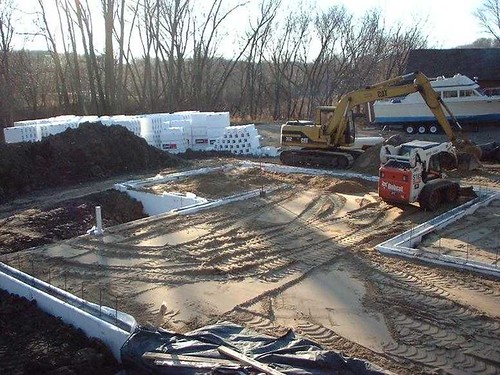
After our newly poured frost walls cured for a few days, we had the excavator return to backfill and dump sand inside the building footprint.


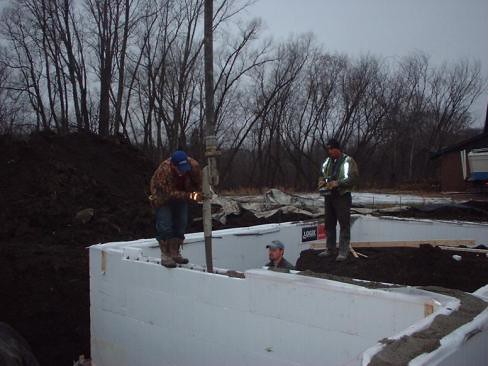
Having our foundation complete felt like an accomplishment and like being back to square one all at the same time. Fortunately, stacking the lower level walls began almost immediately. This process is almost exactly like that of the frost walls except that the forms must be cut and placed in accordance with the location of the window openings. In our case, our print actually details the placement and size of every ICF block for the entire house which is supposed to make things easier for the contractor. In reality, good sounding ideas don't always work as well in application as they do in theory, and this schematic was out the window almost immediately for our house. I can see, however, the potential benefit here for an inexperienced contractor or crew, or for non-custom houses built from a stock set of plans where the schematic can be refined with experience. One of the more time consuming aspects of building with ICF is that the size, shape and location of every window opening must be established and accounted for during forming, and each of these openings needs to be constructed so as to prevent wet concrete from pushing it's way in and collapsing on itself during pouring. Needless to say, there's very little margin for error when you're talking about thousands of pounds of wet concrete. Window "placeholders" are built using bucks of various materials that are the same width as the wall, in our case 12", and that remain in place after the concrete has cured. Often this material is pressure treated lumber which has to be screwed together before it can be placed. A newer development, and method we're using is an extruded vinyl product called V Buck that's held together at the corners with plastic connectors so it only has to be cut to length and snapped together. Not only is this faster, it's also considered better by most pros because it will never degrade like wood. A couple of the bucks are in place in what will be the southeast corner of the living room in the photo below.

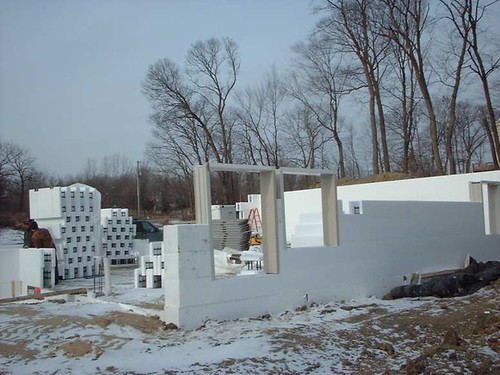
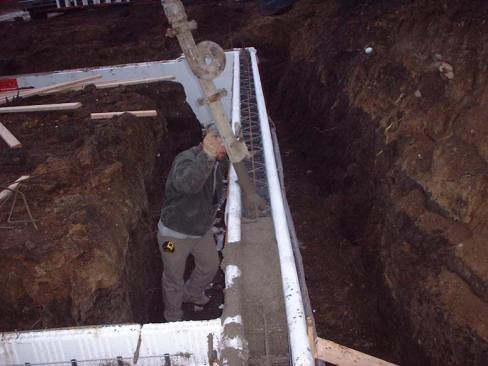
Every few courses of ICF, a frame-like wire ladder is laid down inside the form to provide more lateral stability, and rebar is added both horizontally and vertically according to the manufacturer's specs. In the case of the Logix product we're using, this rebar snaps into the plastic ties that join the two faces of EPS.

One of the small but annoying problems with stacking ICF in winter is snow and ice. Each form has a Lego-like set of buttons on the horizontal edges that needs to be kept free of debris in order to fit to the neighboring course. These buttons interlock very tightly to ensure the formed wall will be structurally sound enough to contain the pressure and force of the wet concrete without "blowing out" during pouring. And any little bit of ice or crud prevents these buttons from locking together, so to avoid headaches, our crew typically covers the exposed buttons on the top course of block with plastic sheeting strips anytime snow is expected or they aren't going to be around for a few days. The vertical edges of each block also have interlocking channels that slot into one another making the stacked wall amazingly strong, and in the case of our 8" forms, strong enough to safely walk atop. A little disconcerting the first time I saw someone up on a Styrofoam box.

This was also the day that a semi-truckload of forms, about half our house's worth, and other materials showed up from Canada. (It seems like 95% of what we're using is made in Canada.) One of the thing I hadn't considered in my pre-GC life was that stuff doesn't just magically jump off the truck that brings it and that it's my responsibility to have arrangements in place to greet and unload materials and to store them, to baby sit lost truck drivers, and to coach them on getting into and out of our site. Glamorous, eh?

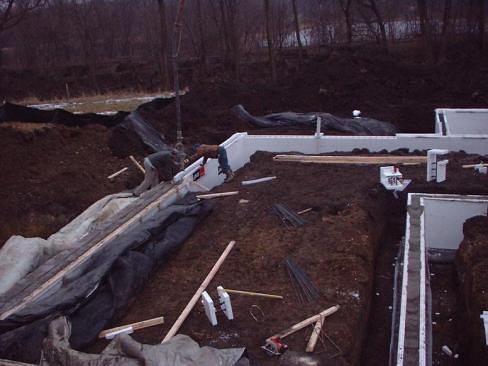
There's really not too much more to the actual wall stacking than that, and it moves along pretty quickly particularly in areas where there's not a lot of openings.

Thursday, February 17, 2005

Financing Our Design

More comments on design and construction financing

Our lot is a walkout and our home design places half the total square footage at grade level meaning half the house is a basement. While this is not at all unusual in our area, it had been our desire from the beginning to build basement-free, i.e. slab on grade, and the idea of a walkout lot presented us with some points of compromise on design.

I've said before that I felt strongly that the kitchen and living room having continuity with the outdoors. I like to be able to blur the line between inside and outside as much as Minnesota's climate allows and this means having immediate access to yard and garden. The most sensible way to to accommodate this and still preserve the view and southern exposure on the walkout lot we bought was to place the kitchen and living room at grade level, or technically, in the basement. Normally I would consider this undesirable but in the case of the lot we bought, the topography allowed this “basement” to be full floor to ceiling daylight on three full sides which helped us retain the essential elements of our design without actually building slab-on-grade. We could happily place kitchen, bedroom and living room at grade level without feeling like we're spending our time living in a basement. It seemed like a logical and obvious decision, but in reality it raised several issues that were unaware existed and had the potential to change the character of our project.

Our design process was happening concurrently with our research of financing options and investigating the construction loan process. During these forays, several “professionals” and construction loan salespeople informed us that we'd never be able to finance a home with the design I had outlined for a number of reasons. As it turns out, this is apparently just another example of peoples' inclination to fixate on the negative and we're fortunate that we didn't automatically accept this as fact because that would have put an end to our project or forced us to settle on an alternate design.

The first and biggest “problem” that was brought to our attention was with the appraisal value of our proposed home. Part of the construction loan approval process is having your plans appraised to verify for the bank that you are planning to build what will become for them a reasonably sound investment. As I said, half our square footage is considered basement and in our case this “basement” contains the core functional elements of a home...the kitchen, living room and master bed and bath. From an appraisal standpoint, anything below grade is not factored in when calculating value for loan purposes, even if the intent and plan is to fully finish the space. What this boils down to is that in the eyes of an appraiser, our cost per square foot equals twice what we're actually spending, since he's only interested in the square footage of the upper level. To him, we're building a three bedroom, one bathroom house because only the rooms on the upper level count. The concession here was that we designed all these “bedrooms” to meet code for egress so that they could be called bedrooms even though this is not our intended use of the space. It could also be said that we're building a house without a kitchen, and this is where things got a little more complicated and worrisome.

We had settled on a construction loan provider despite having been offhandedly told by several people that we wouldn't get financing. In an effort to continue to move the process forward, we figured what the heck, lets just see where we get with the design that reflects exactly what we want which put the walkout level as main living space. Recall that at this point we didn't actually have a set of plans, but just a working print of a floor plan and elevation I had sketched and given to a drafter draw up in D size. Because we had nothing invested in this design other than my time, we figured there was little risk in attempting to get financing approval with what we had. The worst that could happen is that our design wouldn't get the OK and we'd have to be disappointed and start over.
Incidentally, the real estate agent who was representing us in the land purchase also tried to tell us we wouldn't get construction financing without a full set of buildable plans even though she had absolutely no experience with this. This is the same agent who tried to tell us we'd never find land to do with what we pleased that that we'd never get past local zoning restrictions with an unusual--her word-- design. Did I mention I dislike real estate agents?
So it was on to getting our plans appraised, and as has been the case before, stubbornness was my asset. I asked the bank for a referral to some of the appraisers they work with regularly because I figured a familiarity between the parties involved might help. I called one of the appraisers already known to our bank and explained our design to him. He informed me that putting a kitchen on the lower level of a home wasn't entirely unheard of in the area we're building in, apparently because of the high number of lakeshore properties, and that it shouldn't be a problem. Honestly I don't know if this is accurate or just his convenient reasoning, but I guess it doesn't matter. What any appraiser is working off of is “comparables”, or properties in the area that are similar enough so as to provide a baseline value figure with which he can estimate the potential value of our project. In addition to the proposed design of the home, they're also interested in what type of windows, appliances, finishes and mechanical equipment are planned, and what this all seems to boil down to is whether or not the amount of money one is asking to borrow is at least vaguely in line with the implied value of the completed home. I infer that it is unlikely that that any reasonable plan appraisal would ever be called into question in new construction and that as long as something gets built with the banks' money, that's roughly what was planned and not cardboard and tin, you're good, but I guess this remains to be seen since a final appraisal will be required after completing construction.
In the end, after receiving a lot of mostly negative input and spending a lot of energy worrying, we got our appraisal and plan approval without incident or question. This was one of the many times I've felt like calling everyone that had told us it wouldn't happen and gloating and shaking papers in their face, but again, the moral of the story is investigate everything for yourself regardless of who tells you what and don't ever take a single “no” for an answer.


Wednesday, February 09, 2005

December 8th, frost walls

After some tenuous moments during the process of digging our foundation, the footings were quickly formed and poured and made ready to start doing their job. The next step was stacking and pouring the frost walls.
(originally posted to LiveModern 2-9-2005)

Minnesota requires a frost wall depth of 48” which means that exterior walls must extend below grade at to at least this depth (or be buried in at least this much dirt). Our footing is stepped up at the northeast corner of the house because the upper grade level will cover the north and the northernmost part of the east wall to a depth in excess of 48”.


The location of the frostwalls, actually just a below-grade extension of the walls of the house, is laid out using string lines and a laser sight and snapped as chalk lines on the top of the footings. Next the frost wall formed, in our case using the same ICF blocks that will be used form all of the exterior walls. They're stacked like giant Legos, interlocking very tightly at the vertical and horizontal joints, and with ties inside that join the inner and outer faces of foam to provide a fastening point for finish materials and snap-in channels for the required horizontal rebar.

The first course of block is glued down to the footing using foam adhesive to ensure the walls are properly located and once the blocks are stacked to the appropriate height, the rebar verticals are inserted and the walls are straightened by shimming and bracing them against the sides of the trenches.

Since the lower level foundation slab will function as finish floor in our main living space, rebar was placed and embedded in concrete at the top of the frost wall and will later be bent out to extend into the slab and tie the floor to the walls.

We're waiting until near the end of construction to pour the foundation slab, primarily because the finish quality of any concrete flatwork is significantly affected by weather and temperature and we want ours as perfect as we can get it. Pouring during cold weather would have necessitated that, at a minimum, we heat the ground under the slab prior to pouring and that we cover and insulate the slab while it cured, both of which would have been costly and difficult and would not have guaranteed perfect results anyway. Additionally, there's a lot of plumbing and mechanical piping below the foundation slab that requires moderate temperatures to be installed and according to the plumber, the entire structure would have needed to be enclosed and heated. This would have been nearly impossible and again, costly. There was no structural need to pour the foundation slab before proceeding with the walls and upper level so we were able to delay it until spring without holding up construction.

The actual pour of the frost walls was fast and uneventful and it was neat to have a sense of the footprint of the house for the first time. We let the walls cure for a few days and then had the excavator return to backfill the trenches and dump and spread the sand required beneath the foundation slab. While it felt like a big step to have a completed foundation, the bummer of it is that once everything is backfilled it looks like you've accomplished nothing and you're looking at a bunch of really expensive buried stuff.