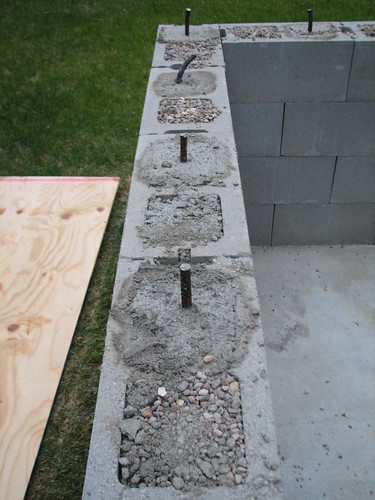
Bridge Slab on the WFO Base
Almost to the fun parts!
The countertop height upper slab upon which the actual oven dome will be built is an unsupported "bridge" that spans the CMU base we just finished building. That means all that's there in the end is a heavily reinforced concrete slab supported on the edges with a big open space below. If you followed along with our house build, it's basically a variation on the construction of our front stoop.
Now, because construction of this type of slab presents the possibility of a ton or so of wet concrete on top of a collapsed form in the middle of a pour, constructing a sturdy support structure is critical. It needs to be strong and reliable to hold up all that wet concrete without sagging or moving yet still be able to be removed once the slab has cured.
Here's the preliminary form. On the top you can see the sheet of plywood that fits into the opening of the base and forms the main platform upon which the concrete will be placed. Before we proceeded, this board got split down the middle to allow it to be removed from below once the slab has cured. Underneath is a couple of stout 2x4 frames to hold the whole thing up, built with plenty of attention paid to ease of removal afterward. The outside of the form is 2 x 6's supported, braced. We shimmed the supports to make the top of th form, and thus the surface of the slab, completely level.
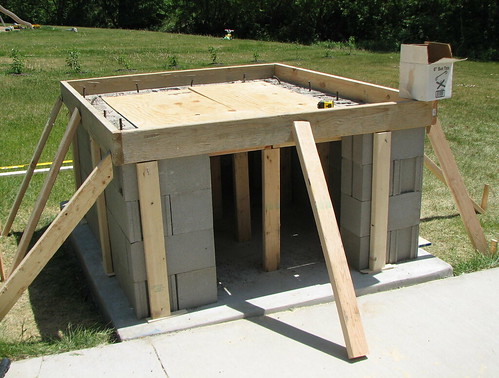
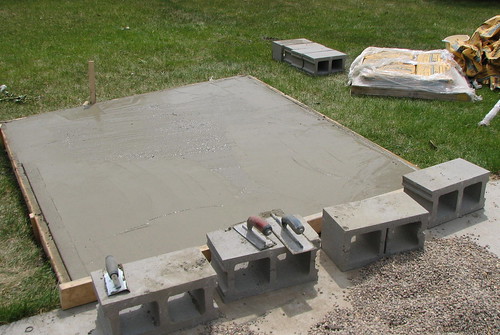
After the form was finished and verifiably sturdy, I cut and tied rebar in a 1' grid and topped that with a sheet of rebar mesh, all of which ends up embedded in the slab. Since concrete on it's own is an extremely brittle material, this is what does the majority of the load bearing, and what allows this bridge to be able to support a load above.
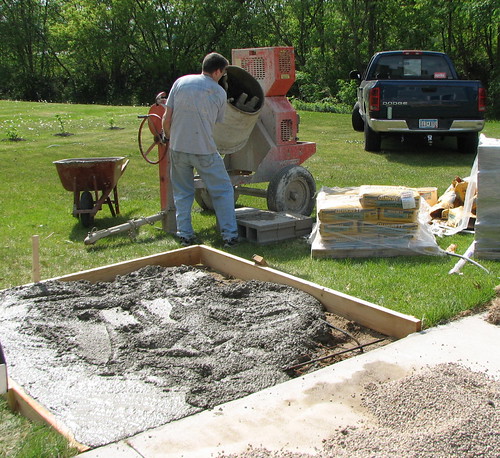
Fortunately, we had our weekend houseguest as helper for this pour. Unlike the foundation slab where we could just dump concrete from the mixer into the wheelbarrow and then into the form, the height of this one meant we had to shovel concrete from the mixer into five gallon pails to be hoisted up and dumped. It slowed the process down considerably, and between that and a hot sunny day, we were thankful for another set of hands to speed things along.
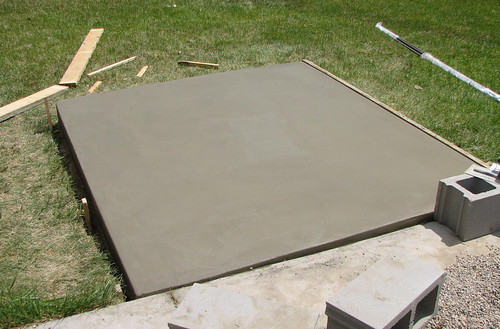
Another few hours worth of waiting on concrete to cure and finishing work, and a few days wait before we removed the supporting formwork, and the last of the boring bits are complete. There's something really exciting about bridge slabs like this, maybe because there's always just a little bit disbelief that it's actually going to hold itself up. So far, so good :)
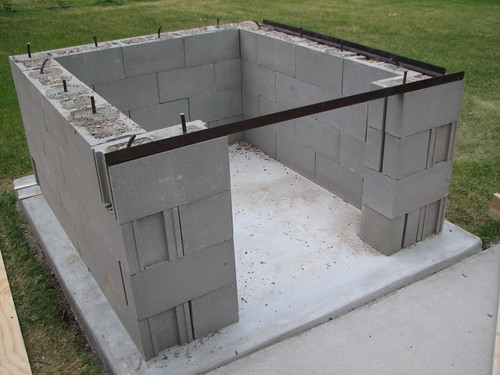
So fast forward a couple of weeks, and here's the finished oven base, with the ceramic fiber hearth insulation in place on top of the bridge slab:
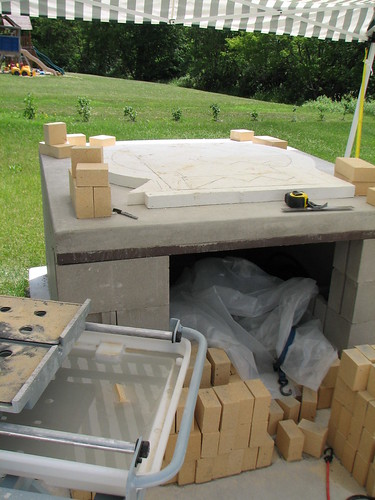
Almost ready to start laying bricks!
Eventually, the entire base will be covered with some sort of finish material and that opening will get some doors. Exactly what finish material I'll go with remains to be seen, but at this point I'm leaning towards a miniature version of the house, meaning cement board and corrugated steel with exposed faseners...
The countertop height upper slab upon which the actual oven dome will be built is an unsupported "bridge" that spans the CMU base we just finished building. That means all that's there in the end is a heavily reinforced concrete slab supported on the edges with a big open space below. If you followed along with our house build, it's basically a variation on the construction of our front stoop.
Now, because construction of this type of slab presents the possibility of a ton or so of wet concrete on top of a collapsed form in the middle of a pour, constructing a sturdy support structure is critical. It needs to be strong and reliable to hold up all that wet concrete without sagging or moving yet still be able to be removed once the slab has cured.
Here's the preliminary form. On the top you can see the sheet of plywood that fits into the opening of the base and forms the main platform upon which the concrete will be placed. Before we proceeded, this board got split down the middle to allow it to be removed from below once the slab has cured. Underneath is a couple of stout 2x4 frames to hold the whole thing up, built with plenty of attention paid to ease of removal afterward. The outside of the form is 2 x 6's supported, braced. We shimmed the supports to make the top of th form, and thus the surface of the slab, completely level.
After the form was finished and verifiably sturdy, I cut and tied rebar in a 1' grid and topped that with a sheet of rebar mesh, all of which ends up embedded in the slab. Since concrete on it's own is an extremely brittle material, this is what does the majority of the load bearing, and what allows this bridge to be able to support a load above.
Fortunately, we had our weekend houseguest as helper for this pour. Unlike the foundation slab where we could just dump concrete from the mixer into the wheelbarrow and then into the form, the height of this one meant we had to shovel concrete from the mixer into five gallon pails to be hoisted up and dumped. It slowed the process down considerably, and between that and a hot sunny day, we were thankful for another set of hands to speed things along.
Another few hours worth of waiting on concrete to cure and finishing work, and a few days wait before we removed the supporting formwork, and the last of the boring bits are complete. There's something really exciting about bridge slabs like this, maybe because there's always just a little bit disbelief that it's actually going to hold itself up. So far, so good :)
So fast forward a couple of weeks, and here's the finished oven base, with the ceramic fiber hearth insulation in place on top of the bridge slab:
Almost ready to start laying bricks!
Eventually, the entire base will be covered with some sort of finish material and that opening will get some doors. Exactly what finish material I'll go with remains to be seen, but at this point I'm leaning towards a miniature version of the house, meaning cement board and corrugated steel with exposed faseners...
posted by splatgirl at 11:42 AM
0 comments
![]()
![]()